Menu
- Home
- About
- Blog
- Classes
- Online Learning
- Publications
- Presentations
- Tech Tuesdays
- Artificial Intelligence (AI)
- Beginner's Guide to BoodleBox
- Using AI For Research
- AI: The Good, The Bad, And the Ugly
- Microsoft Copilot
- AI Plagiarism: Detection, Mitigation, and Course Policies
- Enhancing Course Design and Content Creation with Generative AI
- Automating You With AI
- Teaching In A Trimodal Classroom
- Generative AI Art Workshop
- Augmented Reality, Virtual Reality, Mixed Reality, and the Metaverse
- Getting Students To Switch On Their Webcams
- Sanjay Deshmukh: Gradescope
- Jim Valentine OneNote Class Use
- Tech Kits
- Course Modalities
- New Improvements in D2L
- Introduction to mmhmm
- Looking Good On Camera
- First Year Students and Online Asynchronous Courses
- Hardware Review: Tech Tools for Teaching at Home
- Introduction To Zoom Webinars
- Technology Training Session For New(ish) Faculty
- College Surveys
- Panopto
- Zoom Best Practices
- OpenBoard
- Best Practices for Online Learning
- Respondus Monitor
- Teaching Online During A Pandemic
- Red Flag Mania
- XP-Pen Stylus
- Recording with Zoom and Panopto
- Contingency Prep
- Trimodal Classrooms
- Zoom and Panopto
- D2L Daylight
- 10 Hacks & Gadgets
- How Students Cheat with Technology
- The Collaboratory
- i>Clicker
- Mini Studio
- 3D Printing
- Leap Motion, Chromebooks, and Chromecast
- Windows Surface Pro
- iPad Lecture Capture
- Wacom Cintiq
- Android Pendrives and the Raspberry Pi
- MOOCs
- Blogging For Faculty
- Technology Tools
- XanEdu and CoursePacks Copy
- iPads
- D2L
- Library Timesavers
- Copyright
- Google Wave
- Blackboard
- ScreenFlow
- Filming
- EditGrid
- Sansa Clip and NetBooks
- Livescribe Pulse
- Who Watches The Bloggers?
- Class Recording
- Second Life
- Vyew and Camtasia
Setup
So let us start with the Zoom setup.You will need to download Zoom to your computer at depaul.zoom.us.
Click on the download client link at the bottom of the page.
“Zoom Client for Meetings” is what you should download, and if you use Outlook for email, then the “Microsoft Outlook Add-in” download will make scheduling meetings much easier. You will also want to download the Zoom app to your smart devices as well. Having a second or backup device is extremely valuable - especially if things go wrong unexpectedly.
Once the Zoom app is installed, you will want to check that you are using the most up-to-date version. To do this, click on your profile picture in the app, then check for update.
If you are intending to teach using Zoom, then having multiple monitors is highly recommended. This allows you to present from one monitor, whilst administering the Zoom session from the other monitor. If you use a presentation tool like PowerPoint or Keynote, you can present from one screen and view your upcoming slides and presenter’s notes from the second screen.
You will want to think about uploading a profile picture. This image will be displayed when your camera is switched off. The type of image you decide to display will impact student behavior in your classes, so think wisely before making your choice.
If filming yourself via a webcam, the camera should be at your eye-level. Using an external webcam, or raising the height of your laptop will achieve the required results.
To look good on camera you will want soft lighting in front of you. Professionals invest in desktop lighting to improve their presence on camera. If you want to go this route, there are options like:
Otherwise, see if there is a desk or reading lamp that you can easily repurpose.
The quality of your audio is something that is sometimes ignored, but greatly impacts how video is perceived. A decent microphone, properly positioned with pop-filter will sound dramatically better than the microphone built into your laptop (particularly if your computer’s fan generates noise which can be picked up in the recording).
If you are using Zoom from your desktop, you can also apply a soft focus filter to your webcam image.
You may look great on camera, but your environment may not look as good. You also want to be careful that items in the background do not betray your privacy. You, or someone who lives with you, may have a medical condition, and you may inadvertently show prescription drugs in the background to your Zoom participants. The same advice goes for books, posters, alcohol, and other recreational items that you are happy to display at home, but perhaps less happy to display in more formal environments - particularly since your students can easily record Zoom sessions for posterity. Choose a location that is clean and clear to Zoom from.
Or you can apply a virtual background. Here, your choice of background may impact student behavior in class, so think about what works for the class you are teaching. A fun image may provoke conversation in discussion, but a more serious image may be required for the serious seminar.
The age and power of your computer will dictate if virtual backgrounds are an option for you, and how well they work. Investing in a portable green screen background can improve the quality of the background replacement.
Lastly, running a test of your speaker and microphone before each Zoom session can ensure a more polished and trouble-free class.
Scheduling
You can invite participants to a Zoom session on the fly, but scheduling (and sharing that information with your students beforehand) is a much better course of action.
For internal meetings at DePaul, the recommended process is to do this via Outlook with the Zoom plugin. This ensures that your meetings show up in your DePaul calendar. You can easily invite participants via email. However, the web client allows you to schedule the same way (but you don’t have the integration with your calendar or email). Lastly, you can schedule from inside your D2L course. The Teaching Commons website provides detailed instructions on how to schedule via each of these methods.
You can also add co-hosts when you schedule a meeting. Co-hosts have also the same level of control of the Zoom session. If you are worried that you may not be online at the start of a Zoom session, having a co-host will ensure that the meeting starts on time.
After scheduling a meeting, you can copy and paste the invitation to you meeting attendees (students, remote presenters). The meeting invitation has 4 parts:
If using Zoom for regularly scheduled classes, you can schedule a recurring Zoom meeting. This way your students have the same Zoom link and meeting ID each week. This will reduce the number of students who connect to Zoom late, or at least give them fewer excuses.
For internal meetings at DePaul, the recommended process is to do this via Outlook with the Zoom plugin. This ensures that your meetings show up in your DePaul calendar. You can easily invite participants via email. However, the web client allows you to schedule the same way (but you don’t have the integration with your calendar or email). Lastly, you can schedule from inside your D2L course. The Teaching Commons website provides detailed instructions on how to schedule via each of these methods.
You can also add co-hosts when you schedule a meeting. Co-hosts have also the same level of control of the Zoom session. If you are worried that you may not be online at the start of a Zoom session, having a co-host will ensure that the meeting starts on time.
After scheduling a meeting, you can copy and paste the invitation to you meeting attendees (students, remote presenters). The meeting invitation has 4 parts:
- The URL or Web address. This is a clickable link that initiates the videoconference. This is what the majority of your students will use.
- A regular telephone number (with the option to use local overseas telephone numbers) that a student can use if their computer does not have a microphone and speakers, or if they are without a computer or smartphone. The meeting ID allows them to connect to your meeting.
- H.323/SIP. This is information that a someone using a traditional videoconference room system (i.e. Polycom) would use to connect.
- The meeting ID used for telephone or H.323/SIP connections.
If using Zoom for regularly scheduled classes, you can schedule a recurring Zoom meeting. This way your students have the same Zoom link and meeting ID each week. This will reduce the number of students who connect to Zoom late, or at least give them fewer excuses.
A Very Basic Guide To Scheduling A Zoom Session
The Teaching Commons website provides detailed instructions on how to schedule a Zoom session. Here is a very basic guide that you can follow:
- Go to https://depaul.zoom.us
- Click on “Sign In.”
- 3Login with your Campus Connect credentials.
- Click on “Schedule a New Meeting.”
- Make these changes on the page:
- Topic: Type in the name of your session.
- When: Select the date and time of the meeting in this field.
- Duration: Select the approximate duration of the meeting. The duration is only for scheduling purposes. The meeting will not end after this length of time.
- Time Zone: The default time zone will match the hosts computer time zone. This can be changed by selecting a different time zone from the dropdown.
- Video: Set as “on” for host and participants.
- Mute participants upon entry: Set as enabled (participants can unmute themselves after joining).
- Enable Waiting Room: Selecting this option allows the instructor (host) to control when participants join the meeting. Enable this if you want to control access..
- Only authenticated users can join: Selecting this option restricts access to users with accounts. DePaul students, faculty, and staff have Zoom accounts. Enable this if you want to reduce the chance that uninvited guests join your Zoom session.
- Click on “Save”.
- Click on “Copy Invitation.”
- Go to your D2L course and find a page (such as News) to paste this information.
- You may want to email this to your students as well.
Showtime
So let us focus now on what you should be doing during your live Zoom session. Start each session with a waiting room. This will give you an opportunity to see that your students are connecting successfully before your class starts, without you being on camera. This means too, that your energy levels will be higher when the session officially starts. It is a little like the curtain rising at the start of a theatrical performance. Beforehand, tell your students that they can test their speaker and microphone whilst in the waiting room. Testing audio is something everyone should do for every call.
Prior to class, you want to think about microphone and webcam policy. Muting your microphone when not talking is polite - this reduces feedback and ambient noise. This is policy that you want to suggest to you students. Use of webcams can be a little bit more complicated. In a perfect world, you and all your students would have your webcams switched on - that way everyone gets to see each other, and can communicate non-verbally. However, some students may have valid reasons to not switch on their webcam. They may be in an environment that they do not want to share on camera, they may be looking after children during class, they may not feel comfortable on camera. There is tremendous value in workshopping your expectations during your first class, but being accommodating of students who just don’t want to be on camera.
Zoom allows users to rename themselves. This means that students could pretend to be someone else, or join with a name that you would not recognize. In your syllabus, it is good practice to indicate that you will eject from Zoom anyone that you do not recognize as being enrolled in your course. You may want to take an audible roll call at the start of each meeting to verify that your attendees are who they purport to be. If you see a telephone number in the list participants, you can rename with the student’s identity (after confirming who it actually is).
Ideally you have more that one screen when using Zoom. The recommended setup is two screens, a smartphone, and paper and pen. One screen is for content. Content that you share with your students, or the view of your students in the virtual class. The other screen is for administration - checking the roster of participants, checking the chat window. Having everything on one screen increases clutter and stress. You can check your email on your smartphone (some students may email you during class because they are running late or have connection difficulties). Running email on the same device that you are using for Zoom is not recommended - if you share your screen your students may see things you do not want them to see.
The live scheduled interaction with students should not be pure lecture - that would be a waste of time for you and your students. Ideally, 80% of the time spent during a weekly Zoom meeting should be the students talking, and 20 % of the time spent with the professor talking. These synchronous sessions are an opportunity for students to ask questions, collaborate in small groups, or to participate in a seminar.
In the College of Business, these synchronous Zoom sessions should be no more than 90 minutes but can be shorter.
Faculty can tell students to take a break and come back later (within the 90-minute duration).
Group work is possible via Zoom Breakout rooms.
The meeting times in Campus Connect are fixed - the cannot be changed by faculty.
For example, a traditional in-class course might meet each week for three hours Monday nights from 6:00 to 9:00 p.m. The equivalent Online Hybrid course would meet in Zoom from 6:00 to 7:30 p.m. each Monday.
With small groups, interaction is easy. The gallery view in Zoom easy shows all participants in a call. As class size increases, the size of each video window diminishes. At DePaul, Zoom currently supports up to 300 participants in a Zoom call, but you can only see up yo 49 participants on a screen at the same time. However, you to your students can pin a video. This means a particular video feed is larger than the others and stays on screen. This can be helpful to both you and your students.
Zoom is great at screensharing, but if you do share your screen you will have a reduced view of the other participants in the Zoom session. For this reason, stop sharing your screen if you need to focus on the discussion. Realize that you and students can share content from tablets and smartphones as well as from computers. If the Zoom app is installed on a device, you can choose the Share Screen option, and share content after entering the Sharing Key or Meeting ID. From inside the Zoom session, you or your students can click on Share Screen to share content (providing the Zoom host has allowed this). Which underscores the philosophy of the College of Business when it comes to live Zoom sessions. Try not to lecture - this will be boring to both your students and you. Instead, plan for engagement. Zoom is a tool to collaborate and communicate. This about questions and prompts that you can use to get your students to talk. If you are talking more than your students then something is wrong.
Recording
Your Zoom sessions can be recorded. These recordings can be very helpful to students who missed the live session. Zoom records either on your computer, or in the cloud. Generally, cloud recordings are the safer option. Recording on your computer may add significant load to your system.
As for recording, you have two options. You can make the decision at the time of scheduling your Zoom session that the meeting will be recorded automatically. Or you can remember to press record during the meeting. Each option has its own advantages and disadvantages.
Realize too that your students can record Zoom sessions, perhaps without you noticing. Smartphones and regular computers can record audio and video at the press of a button.
If you want more flexibility in the type of recordings that Zoom provides, or intend to edit the videos, please make these changes. You make these changes in Zoom only once.
- "Sign in" into Zoom at https://depaul.zoom.us
- Click on “Settings.”
- Click on “Recording” and confirm these settings:
- Hosts can give participants the permission to record locally: Off.
- Record active speaker with shared screen: On.
- Record gallery view with shared screen: On.
- Record active speaker, gallery view and shared screen separately: On.
- Active speaker: On.
- Gallery view: On.
- Shared screen: On.
- Record an audio only file: Off.
- Save chat messages from the meeting / webinar: On.
- Add a timestamp to the recording: Off.
- Display participants' names in the recording: Off.
- Record thumbnails when sharing: On.
- Optimize the recording for 3rd party video editor: On.
- Audio transcript: On.
- Save panelist chat to the recording: On.
- Automatic recording: Off.
- IP Address Access Control: Off.
- Only authenticated users can view cloud recordings: Off.
- Require password to access shared cloud recordings. On.
- Auto delete cloud recordings after days: On.
- The host can delete cloud recordings: On.
- Recording consent: Off.
- Multiple audio notifications of recording meeting: Off.
Sharing Recording
After your Zoom meeting is over, you should receive an email informing you that your Cloud recording is available. Logging into Zoom’s website will present you with your recordings, and possibly an audio transcript. Clicking on the “Share” button will bring you to an interface where you can share the recordings with your students. Please note that there is a setting you will want to change. Typically, you will not want your students to be able to download your recordings, so uncheck that option. Then click on the “Copy sharing information to clipboard” link. You can then share that link and password with your students via D2L or email.
Zoom will automatically delete the recordings after 120 days. If you feel that you will need the recordings for a longer period of time, you will want to download the recordings and place in Panopto and D2L. You can download the recordings from the Zoom website. You then choose a page in D2L where you want the video to go. and upload to Panopto via the “Insert Stuff” button. You streamed video can be used in any D2L course, or embedded on a website.
Zoom will automatically delete the recordings after 120 days. If you feel that you will need the recordings for a longer period of time, you will want to download the recordings and place in Panopto and D2L. You can download the recordings from the Zoom website. You then choose a page in D2L where you want the video to go. and upload to Panopto via the “Insert Stuff” button. You streamed video can be used in any D2L course, or embedded on a website.
Sharing Slides As a Virtual Background
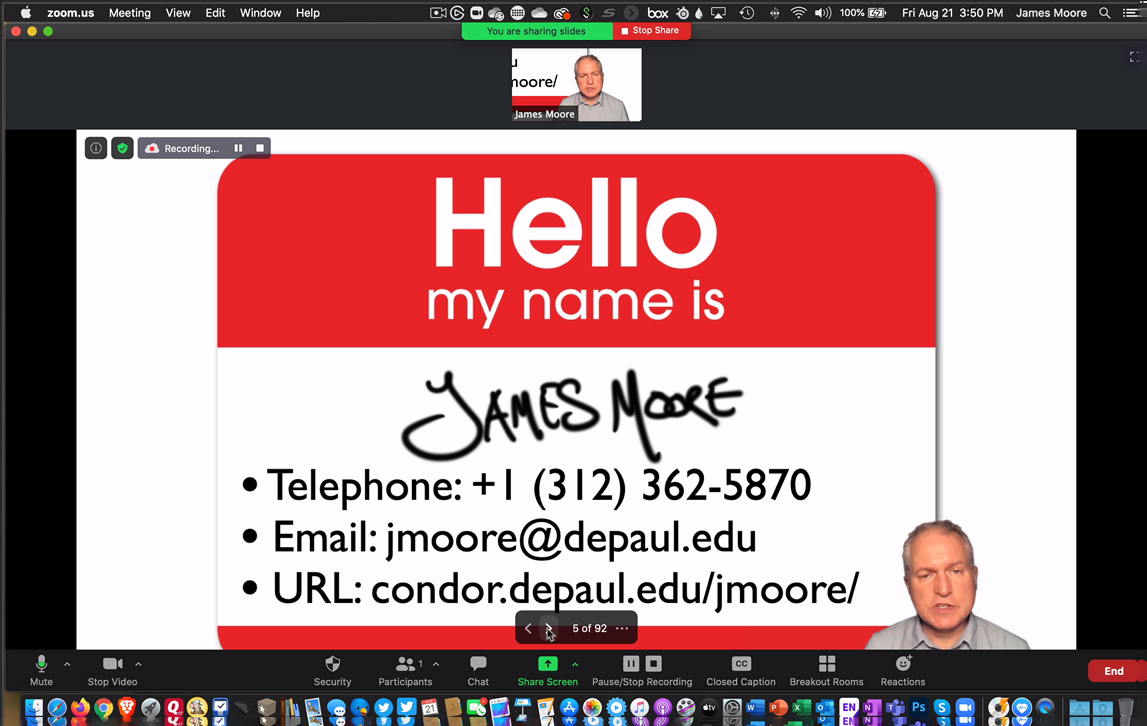
Zoom has a very useful feature for presenting that shares slides as a Virtual Background. Here, slide content from a Keynote or PowerPoint presentation appears behind the talking head of the presenter. This works very well for crafting engaging live content. initially this feature did not show up on recordings, but Zoom has fixed this (as of September, 2020).
Zoombombing Advice
What to do if you get Zoombombed
The university will investigate all Zoombombing incidents. You can report via the form here:
How to lower the chance that you get Zoombombed
1: Update to the latest Zoom client
2: Read the DePaul Zoom documentation
The DePaul “Zoom Teaching Tips and Email Template” has instructions on Zoom best practices and how to secure calls.
3: Switch off attendee annotation when screen sharing
Savvy students have discovered that they can annotate (write on the screen) when the host of a Zoom meeting is screensharing. This can be useful for collaboration, but highly disruptive if your students write on your slides as you lecture. There are two ways to prevent this:
Global: For all your Zoom sessions
Individual: Just for the current meeting
The university will investigate all Zoombombing incidents. You can report via the form here:
How to lower the chance that you get Zoombombed
1: Update to the latest Zoom client
- Sign in to Zoom desktop client.
- Click your profile picture then click Check for Updates.
- If there is a newer version, Zoom will download and install it.
2: Read the DePaul Zoom documentation
The DePaul “Zoom Teaching Tips and Email Template” has instructions on Zoom best practices and how to secure calls.
3: Switch off attendee annotation when screen sharing
Savvy students have discovered that they can annotate (write on the screen) when the host of a Zoom meeting is screensharing. This can be useful for collaboration, but highly disruptive if your students write on your slides as you lecture. There are two ways to prevent this:
Global: For all your Zoom sessions
- Sign in to depaul.zoom.us to access your profile page
- Go to Settings.
- In the Meeting tab scroll down and switch on “Only the user who is sharing can annotate” and click “save.”
Individual: Just for the current meeting
- In the Screen Share menu at the top of your meeting screen, click the More button.
- Select the Disable Attendee Annotation option from the drop-down menu.
Frequently Asked Questions
Can I record attendance in my Zoom sessions?
Yes - Zoom automatically records attendance. You can access this report by:
Can I use polling questions in Zoom?
Yes - You can run polls in Zoom. Additionally, you can download the results and apply this to grades.
Can I create breakout rooms in advance?
You can create breakout room sessions in advance, but all the participants have to have DePaul email addresses (i.e. student@depaul.edu). Zoom will let you upload non-DePaul email addresses to breakout groups (which might let you think things will work), but when you activate the breakout session only the students with DePaul will be allocated to rooms – the others will need to be moved manually.
So, there are couple of things that need to be done:
Here is how you create the breakout rooms.
You then want to tell your students to use DePaul Zoom accounts. You can use this link.
When you schedule your classes, you can prevent students from joining without a DePaul Zoom account. You do this when scheduling a meeting this way:
Here is the text you can use with your students:
I will be creating Zoom breakout sessions before class. For this to work, I need you to connect to the Zoom sessions with your DePaul Zoom account. Instructions on how to do this can be found here:
https://resources.depaul.edu/student-success/technology/Pages/zoom.aspx
If you have a personal or work Zoom account, you will have to log out and log into your DePaul Zoom account before class.
Do you have text I can use in my syllabus?
Yes - Here is some text that you may want to adapt for your syllabus:
This course will be taught live via Zoom. I will provide a Zoom link in D2L for you to connect. I ask that you switch on your webcam during class, as this will make for a richer environment for all of us. Please get in touch with me before class if there is a reason why you cannot switch on your webcam. I will record all Zoom sessions automatically but will only release recording to students at my discretion.
Zoom is an enterprise video/web conferencing and collaboration solution for DePaul's faculty, staff, and student employees.
Please download the Zoom client before your first class and read the Zoom instructions.
Student Frequently Asked Questions
Can I connect from a room system?
Yes. Zoom will allow you to connect from a room system.
Are classes recorded in Zoom?
Yes. The default will be to record classes, but to only share the recording with students at my discretion. If video is shared, it will be in a streamed format.
Are there instructions on how to connect to Zoom?
Yes. You can find them here.
Can I increase the size of the video window, so I I can see the professor and classroom in more detail?
Yes. Complete instructions on how to do this are found here. The quick process is:
Help! My computer is not working, how can I connect to the videoconference?
Zoom supports the PC and macOS operating systems on personal computers, along with room systems. If none of these are available to you, then you can use your smartphone (Android or iOS) to connect as a backup. The experience will not be as good as a desktop computer or room system, but it will allow you to connect. In dire circumstances, or if your microphone and speakers are not working, you can connect via a regular telephone connection.
Do I use the same Zoom meeting ID for all courses at DePaul?
No - Each DePaul course will have a dedicated meeting ID, but the same meeting ID will be used each week of the course.
Yes - Zoom automatically records attendance. You can access this report by:
- Going to http://depaul.zoom.us
- Click on "Meeting."
- You can then run a report on a particular class.
Can I use polling questions in Zoom?
Yes - You can run polls in Zoom. Additionally, you can download the results and apply this to grades.
Can I create breakout rooms in advance?
You can create breakout room sessions in advance, but all the participants have to have DePaul email addresses (i.e. student@depaul.edu). Zoom will let you upload non-DePaul email addresses to breakout groups (which might let you think things will work), but when you activate the breakout session only the students with DePaul will be allocated to rooms – the others will need to be moved manually.
So, there are couple of things that need to be done:
- Create the breakout rooms using DePaul email addresses
- Get students to use their DePaul accounts to connect to Zoom
Here is how you create the breakout rooms.
You then want to tell your students to use DePaul Zoom accounts. You can use this link.
When you schedule your classes, you can prevent students from joining without a DePaul Zoom account. You do this when scheduling a meeting this way:
- Under “Meeting Options,” check “Require authentication to join” and choose “DePaul Zoom accounts only.”
Here is the text you can use with your students:
I will be creating Zoom breakout sessions before class. For this to work, I need you to connect to the Zoom sessions with your DePaul Zoom account. Instructions on how to do this can be found here:
https://resources.depaul.edu/student-success/technology/Pages/zoom.aspx
If you have a personal or work Zoom account, you will have to log out and log into your DePaul Zoom account before class.
Do you have text I can use in my syllabus?
Yes - Here is some text that you may want to adapt for your syllabus:
This course will be taught live via Zoom. I will provide a Zoom link in D2L for you to connect. I ask that you switch on your webcam during class, as this will make for a richer environment for all of us. Please get in touch with me before class if there is a reason why you cannot switch on your webcam. I will record all Zoom sessions automatically but will only release recording to students at my discretion.
Zoom is an enterprise video/web conferencing and collaboration solution for DePaul's faculty, staff, and student employees.
Please download the Zoom client before your first class and read the Zoom instructions.
- Download Zoom Client (https://depaul.zoom.us/download)
- Zoom Video Tutorials (https://support.zoom.us/hc/en-us/articles/206618765-Zoom-Video-Tutorials)
- Zoom Support FAQ (https://support.zoom.us/hc/en-us/articles/206175806-Top-Questions?flash_digest=0d96b1924dbc68c124d363d5d255d51fda1a78e2)
Student Frequently Asked Questions
Can I connect from a room system?
Yes. Zoom will allow you to connect from a room system.
Are classes recorded in Zoom?
Yes. The default will be to record classes, but to only share the recording with students at my discretion. If video is shared, it will be in a streamed format.
Are there instructions on how to connect to Zoom?
Yes. You can find them here.
Can I increase the size of the video window, so I I can see the professor and classroom in more detail?
Yes. Complete instructions on how to do this are found here. The quick process is:
- Click the swap icon at the upper right corner of the Zoom window to switch the content for the video feed.
- Click the icon at the upper right to swap it back or click Switch to Sharing Content.
- Click View Options, then Side-by-Side Mode to switch into Side-by-Side Mode.
- Drag the vertical bar that separates the windows left and right to resize to your preferences.
Help! My computer is not working, how can I connect to the videoconference?
Zoom supports the PC and macOS operating systems on personal computers, along with room systems. If none of these are available to you, then you can use your smartphone (Android or iOS) to connect as a backup. The experience will not be as good as a desktop computer or room system, but it will allow you to connect. In dire circumstances, or if your microphone and speakers are not working, you can connect via a regular telephone connection.
Do I use the same Zoom meeting ID for all courses at DePaul?
No - Each DePaul course will have a dedicated meeting ID, but the same meeting ID will be used each week of the course.