Menu
- Home
- About
- Blog
- Classes
- Online Learning
- Publications
- Presentations
- Tech Tuesdays
- Artificial Intelligence (AI)
- Beginner's Guide to BoodleBox
- Using AI For Research
- AI: The Good, The Bad, And the Ugly
- Microsoft Copilot
- AI Plagiarism: Detection, Mitigation, and Course Policies
- Enhancing Course Design and Content Creation with Generative AI
- Automating You With AI
- Teaching In A Trimodal Classroom
- Generative AI Art Workshop
- Augmented Reality, Virtual Reality, Mixed Reality, and the Metaverse
- Getting Students To Switch On Their Webcams
- Sanjay Deshmukh: Gradescope
- Jim Valentine OneNote Class Use
- Tech Kits
- Course Modalities
- New Improvements in D2L
- Introduction to mmhmm
- Looking Good On Camera
- First Year Students and Online Asynchronous Courses
- Hardware Review: Tech Tools for Teaching at Home
- Introduction To Zoom Webinars
- Technology Training Session For New(ish) Faculty
- College Surveys
- Panopto
- Zoom Best Practices
- OpenBoard
- Best Practices for Online Learning
- Respondus Monitor
- Teaching Online During A Pandemic
- Red Flag Mania
- XP-Pen Stylus
- Recording with Zoom and Panopto
- Contingency Prep
- Trimodal Classrooms
- Zoom and Panopto
- D2L Daylight
- 10 Hacks & Gadgets
- How Students Cheat with Technology
- The Collaboratory
- i>Clicker
- Mini Studio
- 3D Printing
- Leap Motion, Chromebooks, and Chromecast
- Windows Surface Pro
- iPad Lecture Capture
- Wacom Cintiq
- Android Pendrives and the Raspberry Pi
- MOOCs
- Blogging For Faculty
- Technology Tools
- XanEdu and CoursePacks Copy
- iPads
- D2L
- Library Timesavers
- Copyright
- Google Wave
- Blackboard
- ScreenFlow
- Filming
- EditGrid
- Sansa Clip and NetBooks
- Livescribe Pulse
- Who Watches The Bloggers?
- Class Recording
- Second Life
- Vyew and Camtasia
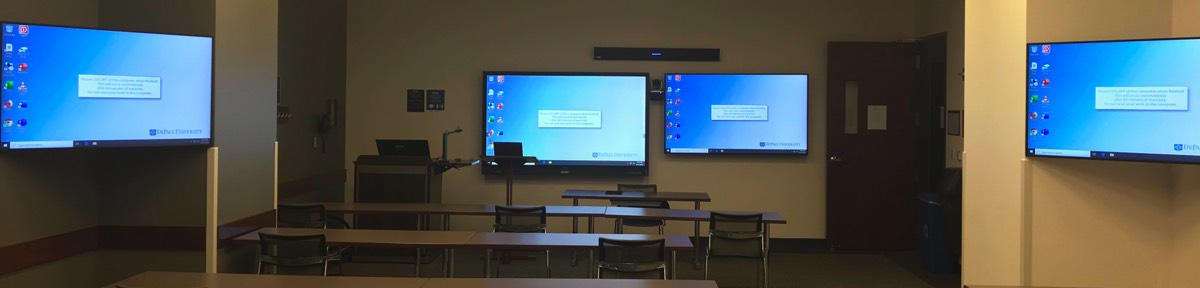

A "Trimodal Classroom" is a Zoom Room-enabled classroom that allows for simultaneous:
- Face-to-face teaching
- Online synchronous teaching
- Recording of the classroom
The video above provides an overview and orientation to teaching Flex in a Trimodal classroom.
Reserving The Room
Courses offered in the “Flex” (FL) modality will automatically be assigned a Trimodal or Zoom+ classroom by Academic Space & Scheduling.
Faculty and staff who need a Trimodal or Zoom+ classroom for a specific event can make a request via Academic Space & Scheduling. Go to Rooms.depaul.edu and make a tech-enabled room request (tutorial here).
Please indicate in the “Room Preference” field if you want a Trimodal room. You can specifically request a Trimodal room. The Loop Trimodal and Zoom+ rooms are listed here (Lincoln Park Trimodal and Zoom+ rooms are listed here).
Scheduling Your Classes
- Log into D2L at https://D2L.depaul.edu
- Click on your course.
- Click on “Edit Course” and select “Zoom.”
- Click on “Schedule a New Meeting.”
- Type in your “Topic” (typically the name of your course).
- In the “When” fields, enter the date and time of your first class.
- Enter the “Duration” of your first class.
- Leave “Time Zone” as GMT.
- Check the “Recurring meeting” checkbox.
- Set the appropriate “Recurrence, Repeat every, and End date” values.
- Check the “Passcode” checkbox in the “Security” section and enter a numeric passcode (this will be easier to type in when you connect from the Trimodal room).
- Select the “On” radio buttons for “Host” and “Participant” in the “Video” section.
- In the “Audio” section, make sure the “Both” radio button is selected.
- In the “Meeting Options” section check the “Mute participants upon entry” and “Record the meeting automatically – In the cloud” checkboxes.
- If you have a Zoom cohost, enter their DePaul email address in the “Alternative Hosts” field.
- Click on “Save.”
- Click on the “Copy the invitation” link.
- Click on the “Copy Meeting Invitation” button.
- Paste this information into communications that your students can see. Suggested options include:
- D2L course homepage.
- Your syllabus.
- Introductory email.
The Teaching Commons has extensive instructions on how to schedule your Zoom classes here.
Using The Room
- If the room is locked, ask Public Safety to open the room for you.
- Switch on the ceiling lights.
- Check that the monitors are on.
- Check that the Dell Podium PC is on. The Podium PC is under the desk, to the right. There will be a white light on the power switch if it is on.
- Check that the PC monitor is on. Power switch is on the bottom right of the monitor. There will be a white light on the power switch if it is on
- On either of the touchscreens, press “Join.”
- One touchscreen monitor is on the podium.
- The other touchscreen monitor is the large display on the wall behind the podium.
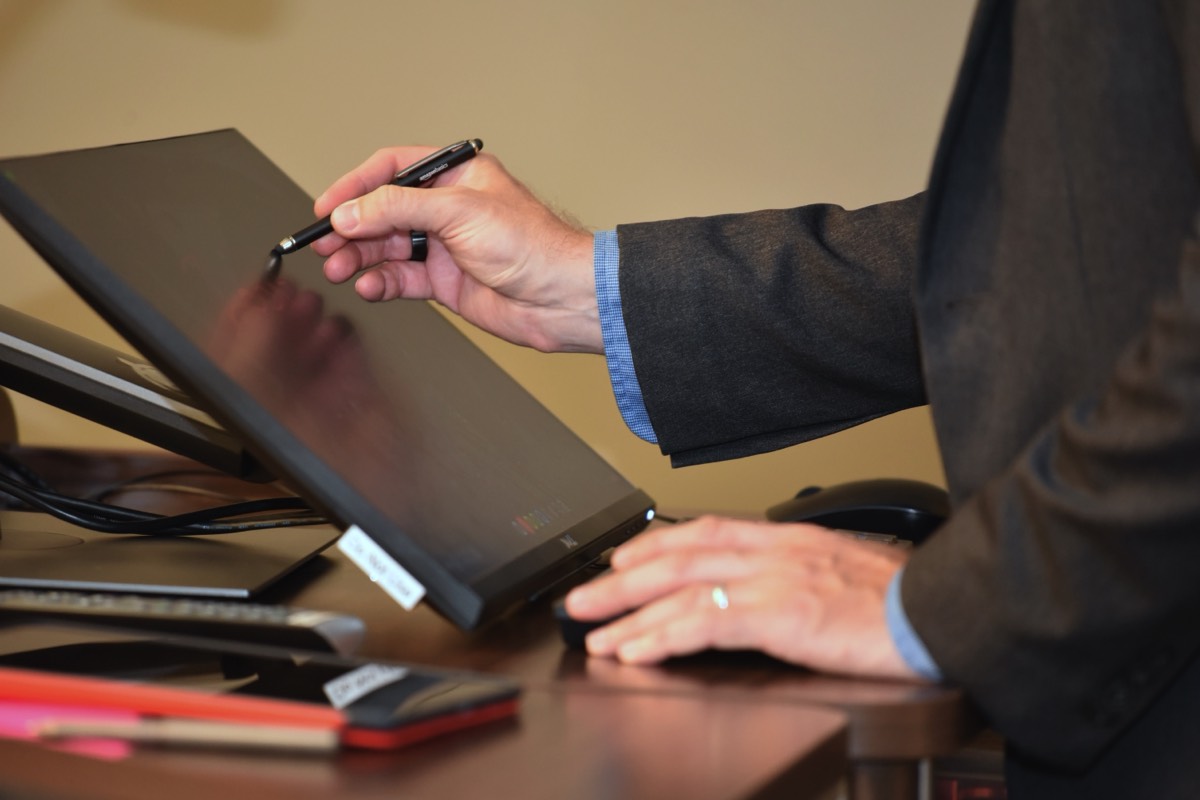
- You can use either your finger or a capacitive stylus to interact with the touchscreens.
- Enter the meeting ID and press “Join Meeting.”
- The meeting ID is a nine-digit number (or longer) created when your meetings are scheduled. This is the same meeting ID that is given to your remote participants to connect.
- Enter the meeting passcode and press “Confirm.”
- You may have to change the keyboard layout on the touchscreen to access numerical keys.
- You are now host for the meeting
- On the touchscreen, press “Share Screen” then “Start Sharing.”
- On the PC, press Ctrl+Alt+Delete on the keyboard to login with your BlueKey username and password.
- On the PC, present as you would normally do in class (PowerPoint, D2L, etc.).
- If you need to show material via the document camera, lift the armature up, then slide the power button down into the on position. The power indicator will change from orange to green.
- You can easily adjust the position and orientation of the document camera.
- When finished with the document camera, slide the power button up into the off position. Your session will resume sharing from the PC.
• Zoom Controls. Your options here are:
When finished with class, press “End Meeting” on the touchscreen controls. Press “End Meeting For All” to confirm. Shut off the ceiling lights. Close the door to the room.
- Mute Microphone: Mutes the room microphones. Press “Unmute Microphone” so your remote participants can hear you again.
- Stop Video: Provides video privacy in the room. Press “Start Video” so your remote participants can see you again.
- Share Screen: Allows you to share PC and document camera content.
- Security: Allows you to adjust the security settings of your meeting:
- Lock Meeting
- Enable waiting room
- Share screen
- Chat
- Rename themselves
- Unmute themselves
- Change View: Changes the display of remote participants on monitor in room:
- Speaker: The remote participant who is currently talking (or who most recently made a noise).
- Gallery: The most recent remote participants.
- Content Only: The PC or document camera content you are sharing.
- Switch Camera: Toggles between front and rear camera.
- Camera Control: Allows you to zoom and pan the room cameras.
- Please note: DPC 5901 has a dedicated physical remote control for the camera controls.
- Manage Participants: Allows you to mute/unmute participants, admit to meeting, etc..
- Invite: Used to invite other participants and Zoom rooms to the videoconference.
- Stop Recording: Stops the video recording. Press “Start Recording” to start recording again.
- This will start and stop a Zoom Cloud recording that has been created for you. If in doubt, do not press stop recording. The Zoom Cloud recordings are separate to any scheduled Panopto recordings.
- Settings: Please do not make any changes here.
- However, doing so will remove control from the podium PC. Safely remove any flash drives and close down any open applications beforehand. Your PC login will be disconnected after 60 minutes of inactivity, but you may want to ensure you are not logged into any secure services before you leave the classroom.
Student Screensharing
Your students (remote and in the physical classroom) may want to share content to main display - this will allow you to collaborate, and to annotate their material. By default, students will not be able to share their screen. However, you can change security settings to allow sharing.
- To allow students to share their screen with you and the class, click on "More" then “Security” on the touchscreen controls.
- Toggle “Share Screen” to on.
- Your students can now share your screen.
- When done, ask your students to stop sharing.
- If you cannot get your students to stop sharing their screens, you can deactivate “Share Screen” under the “Security” settings.
Student Screen Sharing Instructions

- Click the "Share Screen" button located in your meeting controls.
- Select the screen you want to share. You can also choose an individual application that is already open on your computer, the desktop, a whiteboard, or an iPhone/iPad.

- (Optional) Enable these features:
- Check "Share Computer Sound": If you check this option, any sound played by your computer will be shared in the meeting.
- Check "Optimize for full screen video clip": Check this if you will be sharing a video clip in full screen mode. Do not check this otherwise, as it may cause the shared screen to be blurry.
- Click "Share."
Student Share Screen Menu

When you start sharing your screen, the meeting controls will move into a menu that you can drag around your screen.
- Mute/Unmute: Mute or unmute your microphone.
- Start/Stop Video: Start or stop your in-meeting video.
- Participants/Manage Participants: View the participants.
- New Share: Start a new screen share. You will be prompted to select which screen you want to share again.
- Pause Share: Pause your current shared screen.
- Annotate / Whiteboard: Display annotation tools for drawing, adding text, etc.
- More: Hover over more for additional options.
Sharing Meeting Information And Recordings With Students
The Teaching Commons provides complete instructions on how to do this here.
Troubleshooting
Use the room telephone to contact Classroom Tech Support:
(312)362-5900
(Extension 2-5900)
(312)362-5900
(Extension 2-5900)
Frequently Asked Questions

Does the university have documentation on the technology in the Trimodal classrooms?
Yes - here are the key documents:
How do you request an OLA (Online Learning Assistant) for a Flex course?
OLAs can be requested here.
An OLA is a student worker who will (virtually) support your Flex classes. They are there to help facilitate (breakout rooms, audio, chat, etc.).
How do I convince students to turn on their webcams?
We have suggested language for your syllabus here.
What type of stylus should I use in the Trimodal classrooms?
You should use a capacitive stylus. Information Services recommends these for purchase:
Additionally, the Bargains Depot New 5mm High-Sensivity Fiber Tip Capacitive Stylus Dual-tip Universal Touchscreen Pen is highly recommended by some College of Business faculty.
I have a stylus for my Microsoft Surface Pro. Will this work on the touchscreens in the Trimodal classrooms?
No, it will not work. You will have to use a capacitive stylus. However, the Adonit Neo Duo will work - use the "green light" setting to work with touchscreens in the classroom.
What type of background is best for PowerPoint slides and Zoom whiteboard in the Trimodal classrooms?
A black background for PowerPoint slides and a black background for the Zoom whiteboard (click on the “moon” icon) is best. A predominantly white background will result in you looking like a silhouette on camera when standing in front of the displays.
How do I reserve DPC a Trimodal room for my event?
Go to Rooms.depaul.edu and make your reservation.
The request is meant to come from faculty. If the request does not come from faculty, please put the full faculty contact details in the “Event Description” field.
Please indicate in the “Room Preference” field if you want a Trimodal room. You can specifically request a Trimodal room. The Trimodal and Zoom+ rooms are listed here:
Are there best practices on how to teach in these classrooms?
Yes - we recommend Hybrid-Flexible Course Design: Implementing student-directed hybrid classes. An Open Educational Resources (OER) that covers design research "into combining online and classroom college students in the same classes, and turning control over participation decisions to students."
Help! The large touchscreen on the wall is not working with Zoom. I only see the digital whiteboard. What do I do?
If this happens, try these steps:
How do I annotate content on my laptop?
What happens if I join the Zoom meeting from my laptop?
The recommended process is:
Which Trimodal classrooms have motion tracking cameras?
(instructions on how to use the tracking lanyards can be found here)
How do I swap between PowerPoint and Whiteboard?
How do I play videos from my laptop?
Sharing your screen, rather than joining the meeting, will provide the best experience. If you do need to join the meeting, then this workaround can be followed:
How do I activate Multi-Camera Mode?
This will display both the Instructor Camera and the Classroom Camera video feeds to Zoom participants.
How do I activate Multi-Stream mode on the camera?
This will display both the multiple video feeds to Zoom participants, using AI to track multiple people in the room. Accuracy is not 100%, so use with caution.
How do I present from one Trimodal classroom to multiple Trimodal classrooms?
Presenter Classroom Instructions
Student Classroom Instructions
Yes - here are the key documents:
- Classroom Technology Overview
- Using Zoom+ and Trimodal Rooms (Teaching Commons)
- Trimodal Room Quick Guide (Printable PDF)
How do you request an OLA (Online Learning Assistant) for a Flex course?
OLAs can be requested here.
An OLA is a student worker who will (virtually) support your Flex classes. They are there to help facilitate (breakout rooms, audio, chat, etc.).
How do I convince students to turn on their webcams?
We have suggested language for your syllabus here.
What type of stylus should I use in the Trimodal classrooms?
You should use a capacitive stylus. Information Services recommends these for purchase:
Additionally, the Bargains Depot New 5mm High-Sensivity Fiber Tip Capacitive Stylus Dual-tip Universal Touchscreen Pen is highly recommended by some College of Business faculty.
I have a stylus for my Microsoft Surface Pro. Will this work on the touchscreens in the Trimodal classrooms?
No, it will not work. You will have to use a capacitive stylus. However, the Adonit Neo Duo will work - use the "green light" setting to work with touchscreens in the classroom.
What type of background is best for PowerPoint slides and Zoom whiteboard in the Trimodal classrooms?
A black background for PowerPoint slides and a black background for the Zoom whiteboard (click on the “moon” icon) is best. A predominantly white background will result in you looking like a silhouette on camera when standing in front of the displays.
How do I reserve DPC a Trimodal room for my event?
Go to Rooms.depaul.edu and make your reservation.
The request is meant to come from faculty. If the request does not come from faculty, please put the full faculty contact details in the “Event Description” field.
Please indicate in the “Room Preference” field if you want a Trimodal room. You can specifically request a Trimodal room. The Trimodal and Zoom+ rooms are listed here:
Are there best practices on how to teach in these classrooms?
Yes - we recommend Hybrid-Flexible Course Design: Implementing student-directed hybrid classes. An Open Educational Resources (OER) that covers design research "into combining online and classroom college students in the same classes, and turning control over participation decisions to students."
Help! The large touchscreen on the wall is not working with Zoom. I only see the digital whiteboard. What do I do?
If this happens, try these steps:
- Touch the word “Open” in the lower left of the screen
- Select HDMI1
- This will connect it to the equipment in the Zoom room, and allow the user to use the Zoom whiteboard, which will be seen by all Zoom participants.
How do I annotate content on my laptop?
- On your laptop, open Zoom and click on the “Share” option– this will downgrade the Zoom Room to participant and make the laptop the Host of the meeting.
- Enter the meeting ID and password.
- On your laptop, click on “More / Enable annotation for others.”
- Click on “Participants” and make the Zoom Room the Host again.
- The “You are screen sharing” floating meeting controls will be visible to the class via the screen share. You can hide this by clicking on “More / Hide Floating Meeting Controls” (pressing “esc” on the keyboard will return the floating meeting controls to view).
- You can now annotate your content from either of the touchscreens in the classroom.
What happens if I join the Zoom meeting from my laptop?
- The Zoom Room computer will automatically become the Host when joining a Zoom session. However, if the creator of a Zoom sessions joins that meeting (whilst signed in via SSO) they become the Host (taking that setting from the Zoom Room computer). The Host setting then needs to be manually assigned to the Zoom Room computer.
- The same result will happen if the creator of the Zoom session uses the “Share” option in Zoom – this will downgrade the Zoom Room to participant and make the creator’s laptop the Host.
- Making the Zoom Room the Host will not end the shared screen session from the laptop, but it will not enable annotation for this session from the Zoom Room. On the laptop, you need to click on “More / Enable annotation for others.”
- The “You are screen sharing” floating meeting controls will be visible to the class via the screen share. You can hide this by clicking on “More / Hide Floating Meeting Controls” (pressing “esc” on the keyboard will return the floating meeting controls to view).
- There is a lag of about one second for screen-shared content in Zoom session. Framerate for video may be reduced.
- Ending the shared session will result in the Zoom Room becoming Host again (the laptop is no longer in the list of participants).
The recommended process is:
- Join the meeting in Zoom Room (Zoom Room is now the Host).
- Start or join meeting from the laptop (signed in with SSO).
- Mute your laptop microphone and completely silence the laptop speakers.
- This will make the laptop the Host and the Zoom Room a normal participant.
- On the laptop, make the Zoom Room a Co-host.
Which Trimodal classrooms have motion tracking cameras?
- DPC 5901
- DPC 6302
- DPC 7305
- DPC 8204
- DPC 8206
- DPC 8207
- DPC 8209
(instructions on how to use the tracking lanyards can be found here)
How do I swap between PowerPoint and Whiteboard?
- On the touchscreen, press “Share Screen” then “Start Sharing.” The PC is displayed. You can show your PowerPoint.
- To swap to whiteboard, press “Stop Share” on the bottom left of the touchscreen. Press “Whiteboard” at the bottom middle of the touchscreen.
- When you want to go back to PowerPoint, on the bottom middle of the touchscreen, press “Share Screen” then “Start Sharing.” (This green button gets hidden from view after a few minutes of inactivity – you may have to press the bottom of the touchscreen to unhide it.)
- To swap to whiteboard, press “Stop Share” on the bottom left of the touchscreen. Press “Whiteboard” at the bottom middle of the touchscreen.
How do I play videos from my laptop?
Sharing your screen, rather than joining the meeting, will provide the best experience. If you do need to join the meeting, then this workaround can be followed:
- Mute your laptop microphone in Zoom.
- Lower laptop speaker volume to one bar (this prevents audio feedback, but allows your laptop to share audio).
- In Zoom, click “Share Screen.”
- Check “Share sound” and “Optimize for video clip.”
- Select your desktop and click the blue “Share” button.
- Play your video and increase the in-app audio to the maximum (i.e. in YouTube click on the volume icon at the bottom of the video player and adjust to maximum volume).
- If you encounter issues playing video, using the PC in the classroom (rather than your laptop) can be a backup.
How do I activate Multi-Camera Mode?
- On either of the touchscreens, click on “More.”
- Click on “Switch Camera.”
- Under “Multi-Camera Mode,” toggle “Classroom Camera” to on.
- Close down the floating “Switch Camera” window by clicking on the “X” in the top right corner.
This will display both the Instructor Camera and the Classroom Camera video feeds to Zoom participants.
How do I activate Multi-Stream mode on the camera?
- On either of the touchscreens, click on “More.”
- Click on “Camera Control.”
- Select the Main camera. Typically, this is the “Instructor Camera.”
- Click on “Multi-Stream.” Note – this will disable Multi-Camera Mode, click on “Continue” if you encounter this prompt.
- Close down the floating “Camera Control” window by clicking on the “X” in the top right corner
This will display both the multiple video feeds to Zoom participants, using AI to track multiple people in the room. Accuracy is not 100%, so use with caution.
How do I present from one Trimodal classroom to multiple Trimodal classrooms?
Presenter Classroom Instructions
- Create a Zoom meeting and make note of the Meeting ID and Password. You will need this information for all for rooms. Join your meeting first, as this will ensure that your classroom is Host. If you let the student classrooms join the meeting before you then the first classroom to join will be the Host.
- In your classroom, press “Join” on touchscreen and enter Meeting ID and Password. You have now joined the meeting.
- Press “More” then “Switch Camera” then deactivate “Multi-Camera Mode.”
- Make sure the room you are teaching from has “Instructor Camera” as the main camera. The classrooms the students are in should have “Classroom Camera” as the main camera. They deactivate “Multi-Camera Mode” the same way you do.
- Press "More" then "Manage Participants" then "More" then "Hide Non-video Participants."
- On the touchscreen, press “Share Screen” then “Start Sharing.”
- On the PC, press Ctrl+Alt+Delete on the keyboard to login with your BlueKey username and password.
- Present to the students. You may want to use the motion-tracking lanyard.
Student Classroom Instructions
- Press “Join” on touchscreen and enter Meeting ID and Password. You have now joined the meeting.
- Press “More” then “Switch Camera” then deactivate “Multi-Camera Mode.”
- Make sure the student classroom has “Classroom Camera” as the main camera.
- Pin the video feed from the presenter's classroom. Press“More” then “Participants.”
- Press “…” next to the presenter's classroom then “Pin Video” then choose screen 2.
- Press “X” to close the floating Participants window.
- Press “Mute” on the touchscreen when students are not talking. Press “Unmute”when asking questions.