Menu
- Home
- About
- Blog
- Classes
- Online Learning
- Publications
- Presentations
- Social Impact Incubator: AI 2026
- From Chalk to Chatbots: Friday 13th Edition
- AI: The Good, The Bad, And the Ugly (BETA Hub Edition)
- From Chalk to Chatbots
- Practically Speaking
- Yes, And… AI For Everyday
- AI in Teaching Symposium (October 18 2024)
- AI AR Workshop
- Flexing HyFlex
- Educators Guide to Artificial Intelligence (AI)
- AI in Teaching Symposium (May 31, 2024)
- Year of AI
- ABCs of DE (Distance Education)
- Flex Best Practices
- Broadcast Like a Professional (from Home)
- Broadcast like a professional on an amateur's budget
- Turn on, tune in, and drop out
- Overcoming Barriers II
- So, they have asked you to teach an online course…
- The Mini Studio / Video Best Practices
- Finding Value In Online Discussion
- Overcoming Barriers
- Video Best Practices
- Assessment In Online Learning
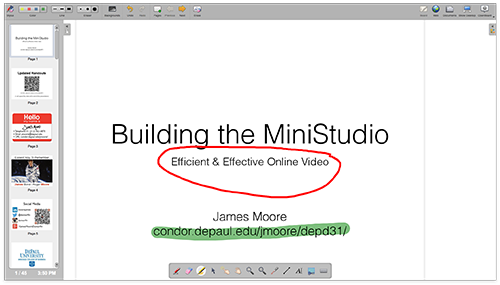
- Building the MiniStudio
- iPad Lecture Capture
- Think Like a Business, Run Like a College: Balancing Both Worlds
- Assessing Students Online
- D2L RUG 2012
- "It's-a me, Mario!"
- One Size Does Not Fit All
- Teaching with Twitter and Google Wave
- Fusion 2010
- D2L Study
- Guerilla Lecture Capture
- Barefoot Vodcasting
- DOTS: ScreenFlow
- DOTS: Video
- Tech Tuesdays
The presentation can be downloaded as a PDF here.
Introduction
We planned the MiniStudio with this scenario in mind: It is Monday morning, and the telephone rings. A near frantic Finance professor is on the line, and tells me “Help! I am teaching three sections of FIN798 this quarter, but my father is very ill. I will be flying out to Australia tomorrow morning. There is nobody else who can teach this class. Is there any way we can film my lecture content?”
My view is that if you can comfortably deal with the emergencies, then you can handle anything that comes your way.
Now filming a professor in a traditional classroom to deal with this type of emergency would be doing a disservice to the students, professor, and the institution. Lugging equipment to a classroom is a waste of resources - filming in the classroom introduces too many opportunities for things to go wrong (imperfect sound, interruptions, awful lighting, the equipment breaks, etc.). The ideal solution is a studio where the professor can walk in, record superlative material, and then walk out ready to do battle with the day.
However, universities and colleges have limited resources. Studios are expensive. We managed to build a MiniStudio for less than $7000 in an unused room. Our MiniStudio soon became a much-requested resource, where we could swiftly create high-quality content for our faculty.
Having limited resources, we did not spend the sight unseen. We iterated our choices, and experimented with borrowed equipment and limited trials. And in complete honesty, we view what we have as an ongoing process of refinement. There are things we did well, but we see plenty of opportunity for improvement.
So lets start by running through how we help our near frantic Finance professor. Ideally we get them into the MiniStudio as quickly as possible, and give them a ten-minute overview of how things might work. Here we both suggest best practices, as well as eliciting the preferred teaching style of our professor. In some cases we are ready to record immediately, but ideally the professor revises material based upon our recommendations. At this point we typically focus on two pieces of software:
1: Open-Sankoré
Free and open-source whiteboard software, which allows a presenter to annotate a sequence of pages. We chose Open-Sankoré because it pushes the presenter into assembling material from multiple sources (PowerPoint, PDF, websites, images, etc.) rather viewing PowerPoint as the way to teach. Our goal is that faculty view primary resources as critical elements of their teaching, and annotation as the way to help students in understanding concepts.
2: ScreenFlow
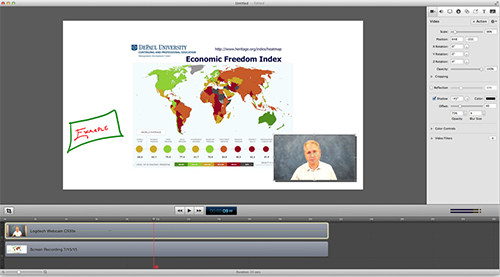
A screencasting tool that allows for the recording, editing, and conversion of anything displayed on a computer screen. We chose ScreenFlow due to its robust and flexible recording capability, along with its streamlined editing environment. We found it very easy to train student workers to edit and produce material.
We begin with showing presenters how the recording process works. In our earlier tests, we soon learned that automation was not always a good thing. Having a prominent button for faculty to start, pause, and stop a recording sometimes resulted in over-eager professors forgetting to start recording, or pausing and never remembering to continue recording as they lectured. Instead we start the recording on their behalf. Editing out dead air at the start and end of a recording was preferable to asking faculty to rerecord. Our MiniStudio has a webcam on an adjustable height microphone stand facing the presenter, at about their eye level. This is placed just in front of the monitor that displays the mirrored content that is to be recorded. The presenter sits on an adjustable height stool with back and footrest. Achieving the right height for all these items allows for appropriate posture during the recording process, important for the webcam video at the start, and improved vocals by not compressing the diaphragm.
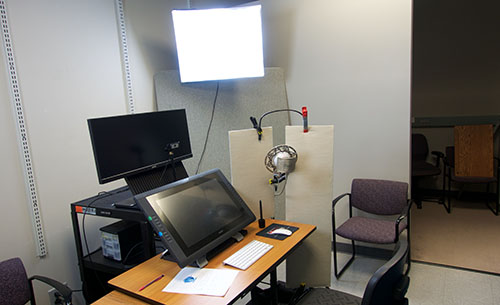
The room is professionally lit, with a backdrop. We share with our faculty that this lighting and backdrop will make them look better. However, our intention is not to have the presenter as a talking head for the entirety of the video. What we coach them into doing is looking at the webcam at the beginning of the recording, maintaining eye contact, and introducing themselves and the topic before moving through their lecture material. Once they actually start teaching, their actions (as they consult notes, move, and focus on annotation) become a distraction to the students watching the completed recording. We leave the webcam to record in all sessions, but use the editing functionality in ScreenFlow to fade out the presenter at an appropriate time near the start of the recording. This is also an opportunity to crop the webcam video, if our presenter has moved to one side of the frame.
We briefly run through the tools that we want faculty to use in Open-Sankoré as they record. Open-Sankoré has a plethora of tools, but the ones that we want to be used are:
![]()
1: Pen
Used to write on the screen in a choice of three thicknesses and four colors. The analogy that worked with out faculty was that this was just like writing on acetate transparencies on an Overhead Projector (OHP).
2: Eraser
Used to clear away (or tidy) annotations. Three sizes or eraser are available.
3: Highlighter
Similar to the pen, in that there are a choice of four colors and three thicknesses of virtual nib.
4: Laser Pointer
A moving red dot, used to show temporary focus.
5: Undo/Redo
Here presenters can quickly backtrack and advance through various stages of their annotations.
6: Pages
This allows for the presenter to insert a blank page into their presentation. Useful for those moments of sudden inspiration.
7: Previous/Next
A simple way to move forward and backwards through the presentation.
8: Erase
Erases all annotation on the screen.
After demonstrating the tools, and letting our faculty experiment, we stop recording with ScreenFlow and quickly show the basic editing we would do in a real recording (cropping and fading out the presenter towards the beginning, deleting the dead air at the start and end). This provides faculty with a firm appreciation of what their recordings will look like, and they are now ready to begin.
Edge Cases
Approximately 80% of the faculty we work with see the advantages of our process, but some have particular needs that change the workflow. Some need to present using PowerPoint, due to a reliance on transitions and animations. We can easily adapt to this. The Wacom Cintiq can still be used to annotate slides, but the option and ease of use do not compare well with Open-Sankoré.
Some faculty we work with need to demonstrate Windows software. In these cases we simply record (via ScreenFlow) from a virtualized version of Windows, or remotely connect to another PC on campus.
What We Learned
We have been using the MiniStudio to record material for classes here at DePaul for ten months now, and we have learned much from the process. There are some key learning experiences to share:
1: The importance of backups

We updated our Mac Pro to OS X Yosemite and soon learned that Open-Sankoré was not compatible (crashing immediately when we ran it). We were able to overcome this issue by rolling back to an earlier version of OS X (although we could have used OpenBoard, a forked version of Open-Sankoré that runs on Yosemite). Having regular backups of the operating system allows for more rapid recovery in these instances.
2: Redundancy
When recording, we save the ScreenFlow files directly to the Mac Pro’s hard drive, but then move these to external media (RAID) for editing. The levels of redundancy protected us from very rare instances where something very horrible might happen.
3: Human intervention

Our process involved faculty recording in a private room, with a staff member on hand in an adjacent area. That staff member would be at their desk working on video projects, but was available to be interrupted and to assist faculty. We dumbed down the recording process such that the staff member started and ended each recording session. Whilst sounding trivial, this greatly reduced the number of accidents (forgetting to record, or exiting ScreenFlow without saving), and provided faculty with the perfect balance of privacy and knowledge that help was on hand.
4: Scheduling
At DePaul we are lucky to have a unified communications system (Outlook), which we used to schedule the studio. This also allowed faculty to check availability outside normal office hours via a busy search. When booking the room we learned to follow the practice employed by dentists everywhere of a courtesy call a day beforehand, along with a reminder email that gave detailed instructions on the filming process and how to find the studio. This resulted in fewer cancelations and delayed arrivals.
5: Quick, rather than perfect
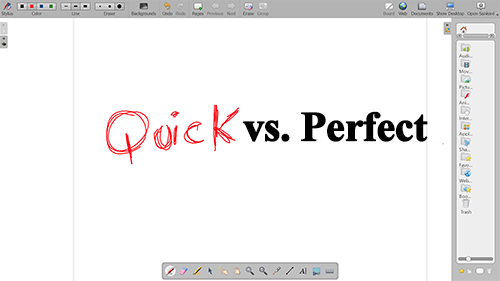
The suggestion that we gave to our faculty was that they should talk through the occasional mistake, rather than rely on editing to remove imperfections. Students were not interested in perfection, but rather rapid feedback and relevant and timely video content. By simplifying the recording and editing process we were able to have videos up in our Learning Management System that day (or the next morning).
Annotated Inventory
Mac Pro (Quad-Core and Dual GPU) Computer
Cost: $2,799.00
We went with a computer here that was a little over the needed specifications here, factoring that this would give us a comfortable 5-8 years in which the computer would meet our needs.
Cintiq 22HD Creative Pen Display
Cost: $1999.00
The central element in our MiniStudio. Designed for digital artists. We dumbed-down some of the functionality for our presenters. The smaller tablets we experimented with are not as robust as the 22HD, and don’t have the screen estate necessary to do a good job.
Blue Microphones Snowball USB Microphone
Cost: 59.00
This is a solid and reliable microphone favored by musicians. The design of the microphone blends period and contemporary, which delighted many of our professors.
Blue Microphones The Pop Universal Pop Filter
Cost: $28.99
Used to reduce both pops (from aspirated plosives) and the buildup of saliva on the microphone.
PylePro PMKS15 Universal Compact Base Microphone Stand with Adjustable and Extendable Boom
Cost: $35.05
Used to isolate the microphone from the vibrations of over-eager presenters, and allowed for flexibility in configuration of the room.
Logitech Webcam C930e
Cost: $89.86
The Logitech C920 webcam was less than reliable in our testing, with the cam sometimes being unavailable in ScreenFlow. The C930e is extremely dependable.
On Stage MS7201B Round Base Microphone Stand
Cost: $21.95
Our webcam stand. Again, this allows for flexibility in the configuration of the studio.
CraftMaster Tubular Steel Adjustable Drawing Table with Multiple Supply Drawers
Cost: $149.97
In retrospect this was the wrong purchase. We thought an adjustable height draftsman table was what we needed, but the Wacom Tablet works well on a level desk. A powered adjustable height desk (suitable for sitting or standing) is what we would have purchased with more budget. These types of desk can get expensive, typically between $1,000 to $2,000 with options.
Adjustable Height Cabinet
Cost: $156.90
Essentially a steel box on wheels. The Mac Pro is kept in the lockable cabinet to prevent presenters from getting physical access to the computer and cabling, although this could present heat issues in other locations. The computer monitor is placed on the top of the cabinet. Again, being wheeled, this allowed for flexibility in the configuration of the studio.
Balt Trax Stool, Model 34430 (Black)
Cost: $182.00
On wheels, with a back for support and footrest. Adjustable height.
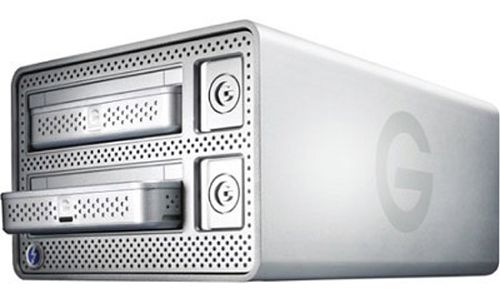
G-Technology G-DOCK ev with Thunderbolt 2TB External Dual-Hard Drive Storage
Cost: $654.95
Not essential, but good practice. We record to the Mac Pro’s hard drive, and then move the recordings to the external drive for editing. The drive supports RAID and is hot swappable. Thus, we build redundancy and certain degree of disaster recovery into the recording process.
Belkin Pivot Wall Mount Surge Protector with 6 Outlets
Cost: $14.49
Not essential, but good practice.
ePhoto Digital Video Continuous Softbox Lighting Kit and Boom Stand Hair Light with Carrying Case H9004SB
Cost: $109.99
The cheapest semi-professional lighting kit we could find at the time.
Acer B296CL Monitor
Cost: $499.99
Large, wide, and cheap.
Muslin Backdrop
Cost: $50
Used to provide a consistent and profession backdrop for filming.
Logitech Wireless Presenter R400
Cost: $39.29
Not an essential item, but a familiar tool that some faculty appreciated using to advance through their slides.
ScreenFlow
Cost: $99.00 (10% academic discount available)
An excellent recording tool, and provides a User Interface that is both powerful and intuitive. Greatly simplifies editing and exporting.
Open-Sankoré
Cost: Free
Whiteboard software. As of the time of writing, does not work with OS X Yosemite. OpenBoard can be used instead.
Acknowledgements
I would like to thank my colleagues at DePaul University for their assistance, guidance, and suggestions during this project: Theophilus Jamal, Josh Lund, and Rick Salisbury (now at Northwestern University).
Follow-up And Frequently Asked Questions
I received some follow-up questions, so sharing them here for all:
Are there any other presentations you have made at the conference?
Yes. You can find everything here, but the ones for the Annual Conference on Distance Teaching and Learning are:
- iPad Lecture Capture (2014)
- Teaching with Twitter and Google Wave (2010)
- Barefoot Vodcasting (2009)
What do you recommend for captioning services?
YouTube’s free service is hard to beat if you have the time, the process is outlined here. For a paid service, you could look at CaptionSync.
What would you do differently?
A few things…
- Using a variable height desk. Probably something like the ones here or here.. Basically as wide as possible, and as easy to use.
- Backdrop with blue background, as well as green for greenscreen.
- Additional monitor for presenter to look at digital notes.
- Larger room, with space for presenter to hang up coat, bags etc.
- Budget to make the room look nice(r).
- Possibly changing microphone to Blue Yeti.
The Open-Sankoré software I used does not work on the most recent version of OS X, and has not been updated for a year. No idea when this will change. We get round this by using an earlier version of OS X which is not ideal. Alternatively you could use the forked version of OpenBoard.