Database Programming in Java
1. History of Databases
When companies converted from paper storage of data to
electrical (computer) storage of data in the 1960’s, they realized that they now
have more efficient ways to access the data than just as files (which were the
electronic equivalent of paper files).
There were several attempts to do this, and the term database was how
these methods were referred to.
There were 3 major methodologies. The first one is now
called the hierarchical model. In this method, a hierarchy is assigned to the
data. For example, to store the
data about class enrollments, the highest hierarchy could be the individual
classes. By accessing a class, one
could find the list of students enrolled in the class. However, in this model it is very time
consuming to find out a class schedule of a particular student. This is because one must visit each of
the classes (one examines data top down) to find out if a particular student is
enrolled or not.
To address this problem, a second model, the network model,
was proposed in 1965. In this model, one creates a linked list of all of the
items that one will want to visit the database. In our class enrollment example, one would have two lists,
one for classes and one for students.
Then one could find in the same amount of time either the class
enrollment for a particular class, or the schedule of a particular student. However, if one wanted to know the
schedule of a particular professor, one would have to visit each class. Of course, one could add a linked list
for the professors. But each link
took up space and the more links one had for the database, the more time and
effort it took for the DBMS (Database Management System) to maintain the
database. And there were always
queries of which there were not necessarily a linked list. For example, which classes are taught
in a particular classroom.
Around 1970, a third model was proposed, the relational
model. This model was proposed by Codd, who was a mathematician by
training. The model is built on a
mathematical discipline called relational algebra. In this model, the database is broken up into tables, which
are normalized to avoid certain anomalies. One gets data from more than one
table by doing an operation called a join. For our above example, we would have five tables, one for
classes, one for students, one for faculty, one for classrooms, and one for
enrollments. Then each of the
questions for class lists, student schedules, faculty schedules, and classes in
a particular room could be answered in the same amount of time.
The relational model is sufficient for all data that can be
expressed in Unicode (an extension of ASCII). However, for data not expressed in Unicode, e.g., x-ray
images at a hospital, the relational model does not work well. A new model, called the object, has
been developed to solve these problems.
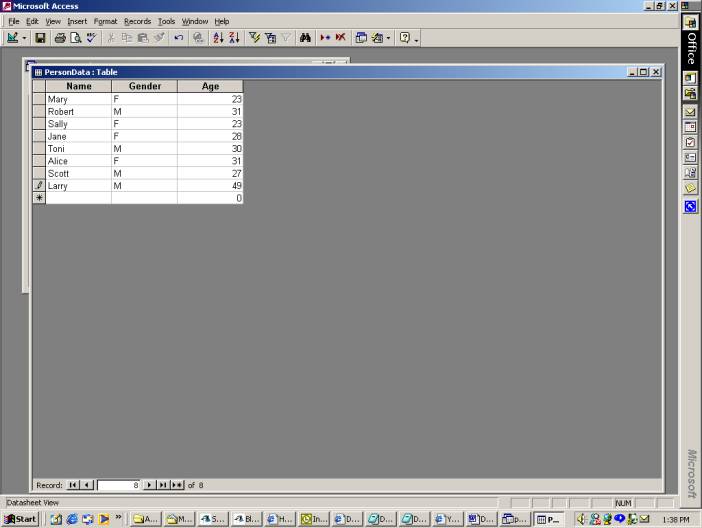
2. Introduction to Relational Databases
A relational database
table or simply a table consists of a rectangular array of data.
Each row in the table is the data for one individual. For example, in the
following table named PersonData, each row corresponds to a person.
|
Name |
Gender |
Age |
|
Mary |
F |
23 |
|
Robert |
M |
31 |
|
Sally |
F |
35 |
|
Jane |
F |
28 |
|
Toni |
M |
30 |
|
Alice |
F |
41 |
|
Scott |
M |
27 |
|
Larry |
M |
49 |
Each row of the table can represent a
variety of data objects, for example, items stocked in a store, airline
flights, or students in a course. The columns of a table are the
individual data variables or attributes of the persons. In the case of the
PersonData table, the columns are Name, Gender, and Age. We refer to the column
representing gender as PersonData.Gender (the same notation as being
part of a class).
Usually a relational database contains more
than one table. The different tables in a database contain related information
that can be combined using common values in the columns.
2. Creating a Database Table with Access
- Start Microsoft Access.
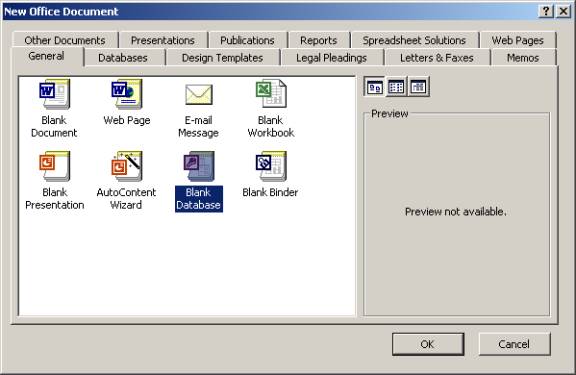
b. Select "File" and "New" in the
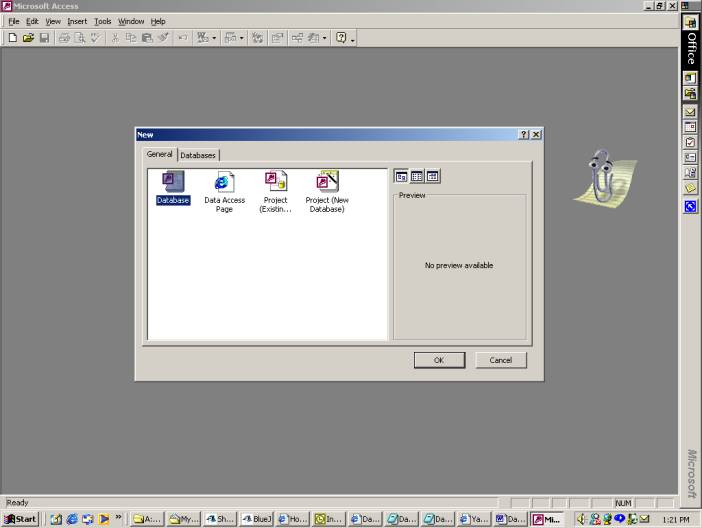
main menu to create a new file. Select "Blank Database".
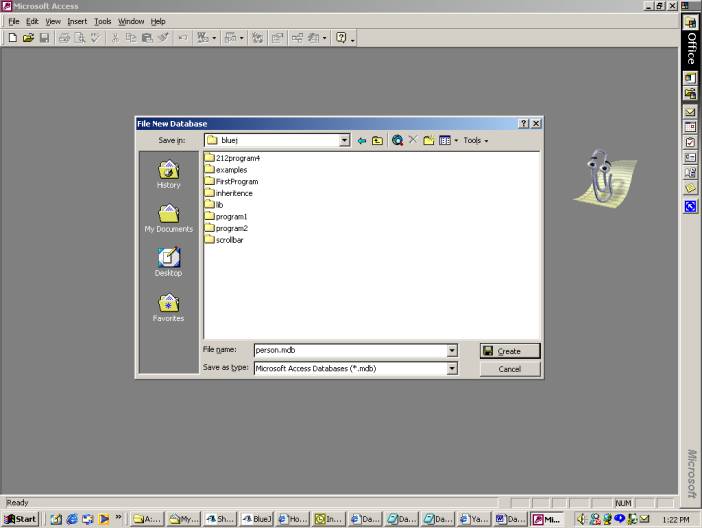
c. Name it Person.mdb and save the new database in the
folder where you want to use it by clicking on "Create."
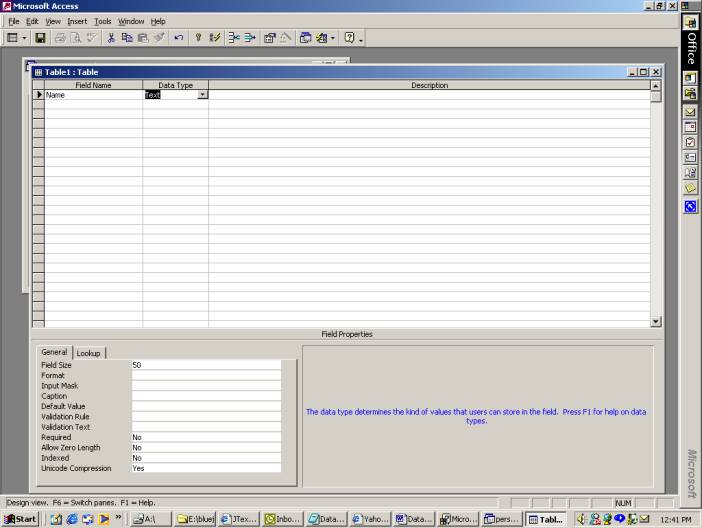
d. Double click on "Create table in design
view" to select the column variables for the table. Enter "Name"
for the Field Name and "Text" for the data type.
e. Choose this as the primary key, by clicking on the
primary key symbol on the toolbar:
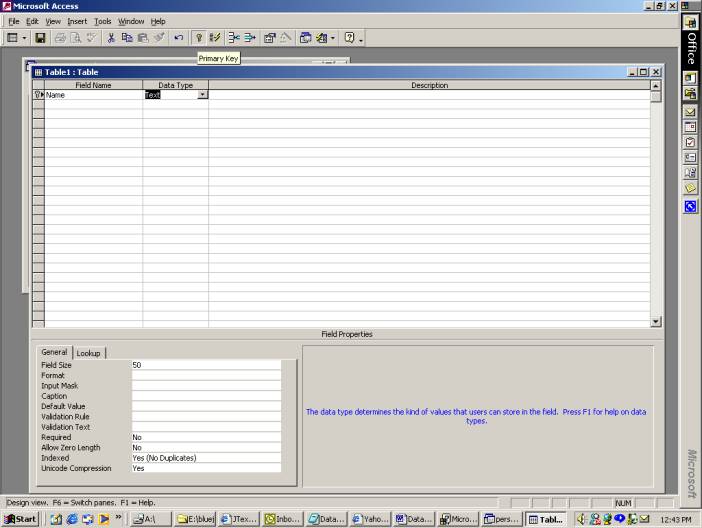
Notice that the Indexed format has changed
from No to Yes (No Duplicates). A primary key means that there can be no duplicate entries
in that field for all entries.
f.
Continue by adding "Gender"
and "Text" for the second column and "Age" and
"Number" for the third column.
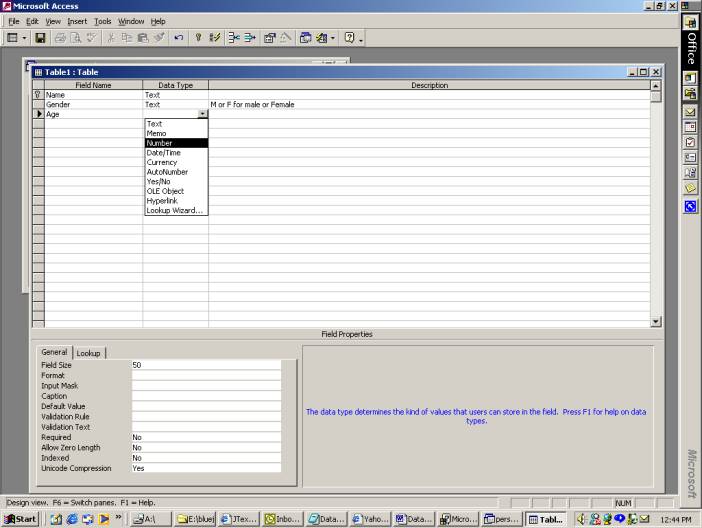
We have not made either of these fields
required (the No in the required field above). This means one can enter records (data) into this table
which do not have values for these fields. If we insisted, for example, that the gender of the entry
always be given, we would have changed this value of “Required” to yes.
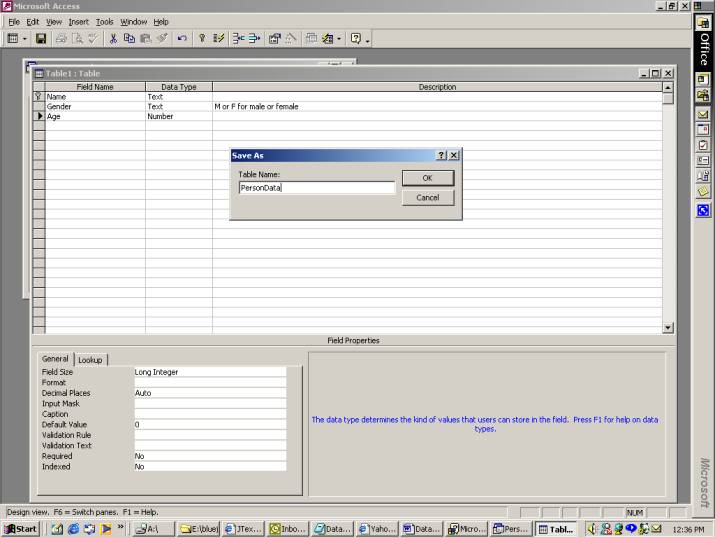
g. Close the "Table1: Table" window when you
are finished. Save the table as PersonData.
h. Double click on "PersonData."
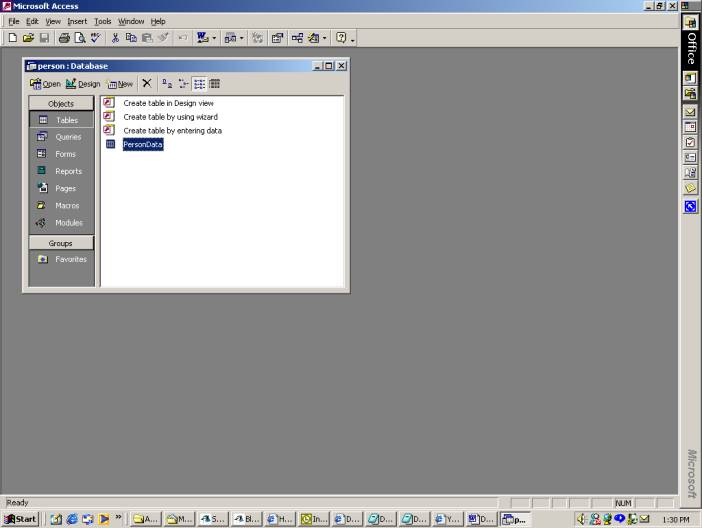
i.
Enter the data in the
table shown in Section 1.
j.
Close the
"PersonData: Table" window and close Microsoft Access.
3. Structured Query Language
Structured Query Language (SQL) is the standard
language for processing tables in relational database. Not only can SQL be used
to process Access databases, it can be used to process other database
management systems such as ORACLE and SQLServer. Although the SQL is a fairly
extensive language with capabilities for intricate manipulations of tables from
a database, we will restrict our discussion to these SQL statements: SELECT,
CREATE, INSERT, DELETE, and DROP.
4. SQL Select Statements
A SELECT statement is used to extract a new table
from an existing table or tables. This new table can be used to display or
further process the data. Here are some examples of SQL statements extracting
information from the Person database, which contains the single table
PersonData.
- SELECT * FROM PersonData
Select all rows and columns from the table PersonData.
|
Name |
Gender |
Age |
|
Mary |
F |
23 |
|
Robert |
M |
31 |
|
Sally |
F |
35 |
|
Jane |
F |
28 |
|
Toni |
M |
30 |
|
Alice |
F |
41 |
|
Scott |
M |
27 |
|
Larry |
M |
49 |
b. SELECT Name FROM
PersonData
Select all rows, but only the column Name.
|
Name |
|
Mary |
|
Robert |
|
Sally |
|
Jane |
|
Toni |
|
Alice |
|
Scott |
|
Larry |
c. SELECT Name, Age FROM
PersonData
Select all rows but only the columns Name and Age.
|
Name |
Age |
|
Mary |
23 |
|
Robert |
31 |
|
Sally |
35 |
|
Jane |
28 |
|
Toni |
30 |
|
Alice |
41 |
|
Scott |
27 |
|
Larry |
49 |
d. SELECT * FROM PersonData
WHERE Name = 'Alice'
Select all columns, but only the row with the name Alice. Note that Text
constants in SQL use single quotes.
|
Name |
Gender |
Age |
|
Alice |
F |
41 |
e. SELECT Name FROM
PersonData WHERE Gender = 'F'
Select the names with the gender F.
|
Name |
|
Mary |
|
Sally |
|
Jane |
|
Alice |
f.
SELECT * FROM PersonData WHERE Gender = 'F' and Age = 34
Select all columns and only the rows with Gender F and Age 34. There are no tuples
satisfying these constraints, so the resulting table has zero rows.
|
Name |
Gender |
Age |
Sometimes, an SQL must be constructed from
information supplied at runtime in a Java program. Suppose that you want to
select all columns from the table where the name is supplied in the local
variable name. Here is what you do:
SQL =
"SELECT * FROM PersonData WHERE Name = '" + name + "' "
Note that text constants in SQL must be
enclosed in single quotes, even when the text constant is obtained from a
variable at run time. The last
double quote (") is the closing double quote for the double quote before
Select. We put the double quotes around the variable name to indicate that it is a variable. Be sure not to put a space between the
single quote(') and the double quote ("). Otherwise, the search will be done by
adding a leading space to the value of the variable name.
5. Getting Information from two Tables
In Relational databases, the data is usually
divided between several tables. E.g., in our above example, suppose we have the
following two tables of data, the PersonData table:
|
Name |
Gender |
Age |
|
Mary |
F |
23 |
|
Robert |
M |
31 |
|
Sally |
F |
35 |
|
Jane |
F |
28 |
|
Toni |
M |
30 |
|
Alice |
F |
41 |
|
Scott |
M |
27 |
|
Larry |
M |
49 |
and the SalaryData table:
|
Name |
Salary |
|
Mary |
20000 |
|
Robert |
25000 |
|
Sally |
23000 |
|
Jane |
30000 |
|
Toni |
15000 |
|
Alice |
28000 |
|
Scott |
20000 |
|
Larry |
23000 |
where we assume that all of the names are
unique, i.e., there are no duplicate names in the name column.
Suppose we want to know the names and
salaries of all of the females who earn at least $25,000. The information that
we need is split between the two tables. (Just knowing the name does not imply
the gender, as some names are used by both genders, as "Toni", for
example.) The gender is in the first table, and the salary is in the second
table.
The SQL statement that does this is:
SELECT
SalaryData.Name, Salary
FROM PersonData,SalaryData
WHERE PersonData.Name = SalaryData.Name AND PersonData.Gender = 'F' AND
SalaryData.salary >=25000
The PersonData.Name = SalaryData.Name
is how we extract the information from the two tables. We only look at those
rows in the two tables which only have the same name (hence are the same person
as we assume that names are unique), and then restrict ourselves to those whose
gender is female and whose salary is at least $25,000. The resultant table is:
|
Name |
Salary |
|
Jane |
30000 |
|
Alice |
28000 |
6. Setting Up an ODBC Connection
ODBC means Open Database Connectivity. It
is a standard for the software interface between database management programs
and the SQL language.
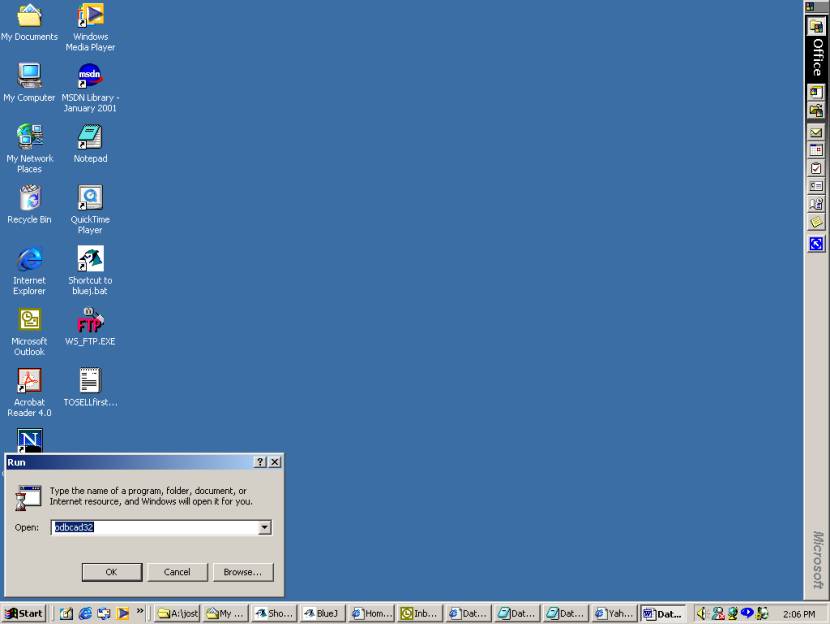
a. Select Start and Run. Type odbcad32 in the Open
ComboBox and click on OK. You will get an ODBC Data Source Administrator
dialog.
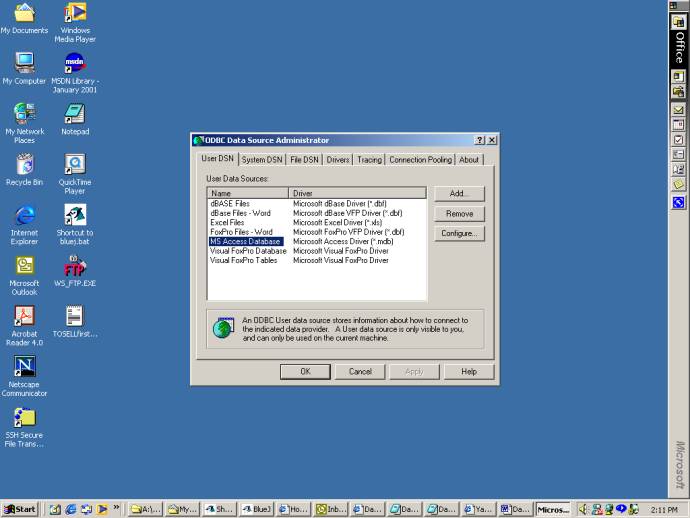
b.
Select
the Add button on the right.
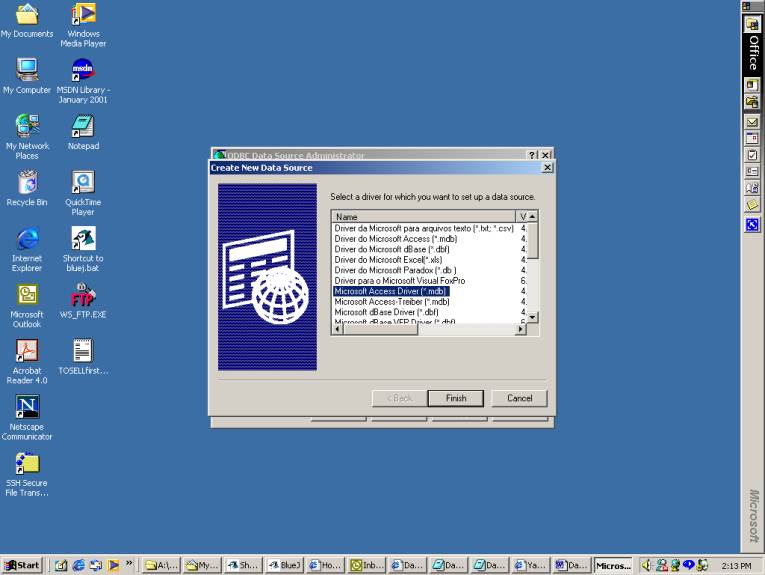
c.
You
will get a Create Data Source dialog. Make sure that Microsoft Access Driver (.mdb) is
selected and click on Finish.
d.
You
will get an ODBC Microsoft Access Setup dialog.

e.
Type
in the DataSource name (Person) and a Description (optional). (Make sure that the None radio button
is clicked.)
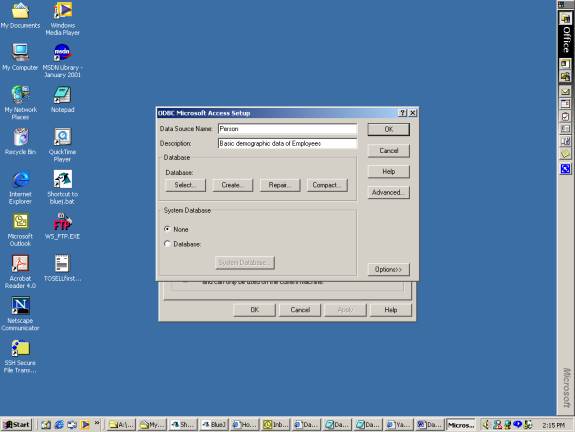
f.
Then
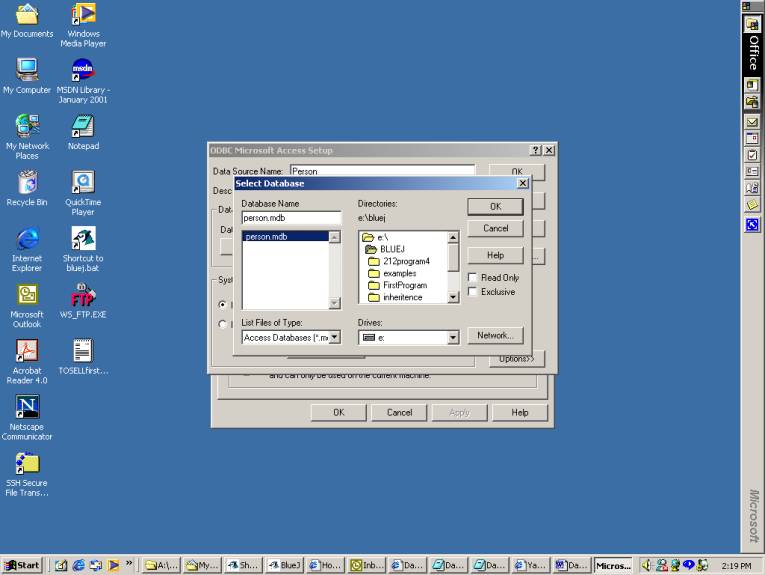
click on Select. You will get a Select Database dialog.
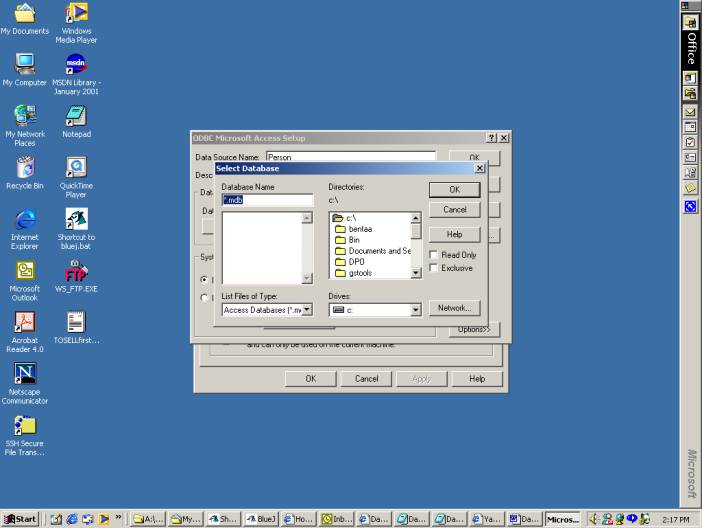
g.
Select
the drive and the directory where the database is located. You should then see
the .mdb file on the left. Select it. You should see the name of the database
appear in the Database Name text field. Then click on OK in the Select Database
dialog.
h.
Click
on OK in the ODBC Microsoft Access Setup dialog.
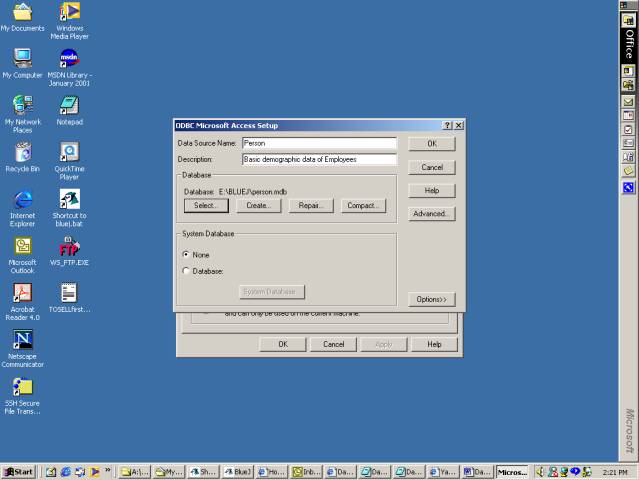
i.
Click
on OK in the ODBC Data Source Administrator dialog.

j.
The
ODBC DataSource Person is now ready to use.
7. Creating a Java ResultSet
To process the information in a table, a
Java ResultSet object is created that contains the output from an SQL SELECT
statement. The data in the object can then be processed sequentially to display
it or process it further. Here are the steps to creating a ResultSet object in
a Java application.
a. Include the line
import
java.sql.*;
at the beginning of any file that uses
any of the classes Connection, Statement, or ResultSet.
b.
Use
the statement
Class.forName("sun.jdbc.odbc.JdbcOdbcDriver");
to load the JDBC
ODBC Driver. JDBC means Java Database Connectivity.
c. Create the connection object c using
the name of the ODBC data source Person.
Connection c =
DriverManager.getConnection("jdbc:odbc:Person");
d. Create a Statement object, which manipulates
the database using SQL expressions.
Statement s = c.createStatement();
e.
Create
a Result object that uses the Statement object.
query = "SELECT * FROM Roster WHERE Gender = 'M'"
ResultSet r = s.executeQuery(query);
The query can be
any select statement that processes the dataset specified in the Connection
object c. Here is the result set that is obtained from the preceding query.
|
Name |
Gender |
Age |
|
Beginning of File Buffer Row |
||
|
Robert |
M |
31 |
|
Toni |
M |
30 |
|
Scott |
M |
27 |
|
Larry |
M |
49 |
|
End of File Buffer Row |
||
f.
BOF
is the abbreviation for the Beginning of File Buffer; EOF is the abbreviation
for the End of File Buffer.
g.
Navigate
through the result set by moving the cursor forward though the recordset. (The cursor
is a reference to the current row.) The following method call moves the cursor
forward one row:
r.next()
If one wishes to process all the rows of the recordset, a while loop is used.
The cursor of the result set is initially set at BOF. r.next() returns true when the new row is
valid (not on the EOF or BOF buffer rows). Therefore, the following while loop
traverses the entire result set:
while (r.next())
{
// body of while loop
}
The first r.next() call moves the cursor from BOF to the first valid row. The
while loop continues until the cursor reaches EOF where r.next() returns false so the while loop
terminates.
Here are ResultSet methods for obtaining field values from a row. They return
the value of the field in the requested format.
int getDouble(int columnNumber)
int getInt(int columnNumber)
int getString(int columnNumber)
Other datatypes
like short, long, and float are also available.
h.
Close
the connection with this line:
c.close();
Here is a complete Java application that reads the data from the
PersonData table and prints the values in the terminal window.
// Sample Java
Application that reads from
// the PersonData table of the Person database.
import java.sql.*;
public class Main
{
public static void main(String[] a)
throws ClassNotFoundException,
SQLException
{
try
{
//
Load database driver.
Class.forName("sun.jdbc.odbc.JdbcOdbcDriver");
// Create
Connection object.
Connection
c = DriverManager.getConnection(
"jdbc:odbc:Person");
// Create
Statement object.
Statement
s = c.createStatement();
// Create
ResultSet object.
String
query = "SELECT * FROM PersonData";
ResultSet
r = s.executeQuery(query);
// Traverse the
result set to print data.
String
name;
char
gender;
int
age;
while
(r.next())
{
name = r.getString(1); //find
by column in row
gender =
r.getString(2).charAt(0);
age = r.getInt(“Age”); //find by attribute name
System.out.println(
name
+ " " + gender + " " + age);
}
catch(ClassNotfoundException
cnfex)
{
cnfex.printStackTrace(); //sent to console window
System.out.println(“Connection
unsuccessful\n”+cnfex.toString();
}
catch(SQLException
sqlex)
{
sqlex.printStackTrace(); //sent to console window
System.out.println(“Connection
unsuccessful\n”+sqlex.toString();
}
catch(Exception
ex)
{
ex.printStackTrace();
System.out.println(ex.toString());
}
//
Close the Connection object c.
c.close();
}
}
Here is the output:
Mary F 23
Robert M 31
Sally F 35
Jane F 28
Toni M 30
Alice F 41
Scott M 27
Larry M 49
8. SQL Update Statements
In addition to the SELECT statement there
are additional SQL statements for changing a table in a database. We will
create a new table which requires the CREATE and INSERT statements, and how to
update data in a database, which requires the UPDATE statement.
To create a new table PersonData2 with fields like the PersonData table
use this
SQL statement:
CREATE TABLE PersonData2 (Name Text, Gender Text, Age Number)
To insert a row in the table, use this line:
INSERT INTO PersonData2 VALUES ('Nancy', 'F', 19);
Here is a Java application that reads data from the text file
d:\Person.txt. and loads it into the Person2 table.
// Sample Java Application to create a new
// table in an Access database.
import java.sql.*;
public class Main
{
public static void main(String[] a)
throws ClassNotFoundException,
SQLException
{
// Load database driver.
Class.forName("sun.jdbc.odbc.JdbcOdbcDriver");
//
Create Connection object.
Connection c =
DriverManager.getConnection(
"jdbc:odbc:Person");
//
Create Statement object.
Statement s = c.createStatement();
//
Create PersonData2 table.
s.execute(
"CREATE TABLE
PersonData2 " +
"(Name Text, Gender
Text, Age Number)");
//
Insert a row into the table.
int result = s.executeUpdate(
"INSERT INTO
PersonData2 VALUES " +
"('Nancy', 'F',
19)");
if (result == 1)
{
//update
successful
}
else
{
//update
unsuccessful
}
//
Close the Connection object c.
c.close();
}
}
To add 1 to the ages of all the females in the table, use this line:
UPDATE Person SET Age = Age + 1 WHERE Gender = 'F';
The following line deletes all lines from the database satisfying the
WHERE condition:
DELETE * FROM Person WHERE Age > 55;
As with the UPDATE, the execution of a
DELETE is tested with a returned integer (int) , with a value of 1 if
successful.
Finally this line removes the table from the database:
DROP TABLE Person;
9. Populating a Table with Data from a Text
File
The following application creates the table
PersonData2 in the ODBC Datasource Person, then reads data from the text file
d:\Person.txt and inserts it into the new table. Note the use of catch..try
blocks are used to facilitate exception handling.
// Sample Java Application to create a new
// table in an Access database and populate
// it with data from text file.
import java.sql.*;
import java.io.*;
import java.util.*;
public class Main
{
public static void main(String[] args)
throws
SQLException
{
// Load database driver.
try
{
Class.forName("sun.jdbc.odbc.JdbcOdbcDriver");
}
catch(ClassNotFoundException e)
{
System.out.println(e);
}
//
Create Connection object.
Connection c =
DriverManager.getConnection(
"jdbc:odbc:Person");
//
Create Statement object.
Statement s = c.createStatement();
//
Create PersonData2 table if
// table does not exist already.
try
{
s.execute(
"CREATE TABLE PersonData2 " +
"(Name Text, Gender Text, Age Number)");
}
catch(SQLException e)
{
System.out.println(
"PersonData2 table already exists.");
}
//
Create BufferedReader object.
BufferedReader br = null;
try
{
br = new BufferedReader(
new
FileReader("d:\\Person.txt"));
}
catch(IOException e)
{
System.out.println(e);
}
//
Insert rows into the table.
String line, name, gender, sql;
int age;
StringTokenizer st;
try
{
while ((line =
br.readLine()) != null)
{
st =
new StringTokenizer(line, " ");
name =
st.nextToken();
gender
= st.nextToken();
age =
Integer.parseInt(st.nextToken());
sql =
"INSERT INTO PersonData2 " +
"VALUES ('" + name + "', '" +
gender + "', " + age
" )";
// The
next line is for debugging.
System.out.print(sql);
int result
= s.executeUpdate(sql);
if
(result == 1)
System.out.println(“\t\t
Insertion Successful”);
else
System.out.println(“\t\t
Insertion failed”);
}
}
catch(IOException e)
{
System.out.println(e);
}
//
Close the Connection object c.
c.close();
}
}
Here is the output to the terminal window.
INSERT INTO PersonData2 VALUES ('Mary',
'F', 23)
INSERT INTO PersonData2 VALUES ('Robert', 'M', 31)
INSERT INTO PersonData2 VALUES ('Sally', 'F', 35)
INSERT INTO PersonData2 VALUES ('Jane', 'F', 28)
INSERT INTO PersonData2 VALUES ('Toni', 'M', 30)
INSERT INTO PersonData2 VALUES ('Alice', 'F', 41)
INSERT INTO PersonData2 VALUES ('Scott', 'M', 27)
INSERT INTO PersonData2 VALUES ('Larry', 'M', 49)
The new table PersonData2 has also been created if everything is working
properly.
Note, in the above for the: '" + name + "', if
you type in (' ") instead of ('"), you will insert a leading blank
into the name. I.e., the inputs would be ' Mary', '
Robert',etc. This can cause problems because ' Mary' is not the
same as 'Mary'.
Note, the executeUpdate method
returns a 1 if the update was successful.
Thus, we test for it with its return value which we assign to result. The
same holds true for a DELETE or UPDATE query. One forms the query and sends it to the database via
the method of executeUpdate. The method will return a 1 if
successful.