| Contents [0/18] |
| Overview of Today's Class [1/18] |
| JNDI [2/18] |
| Using JNDI in Tomcat [3/18] |
| Setting up hsqldb [4/18] |
| Java Code in JSPs - different mechanisms [5/18] |
| JSP Expression Language - concepts [6/18] |
| JSP Expression Language - capabilities [7/18] |
| JSP Expression Language - setup [8/18] |
| JSP Expression Language - accessing variables [9/18] |
| JSP Tag Extensions [10/18] |
| Creating Tags [11/18] |
| Implementing a Tag Handler [12/18] |
| The SimpleTag Interface [13/18] |
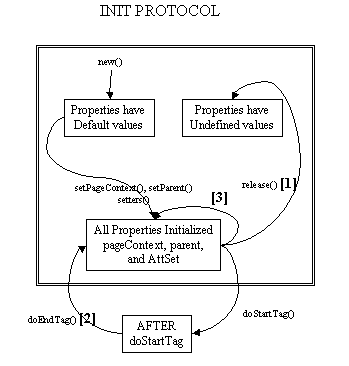
| The Tag Interface [14/18] |
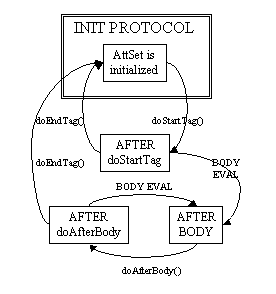
| The IterationTag Interface [15/18] |
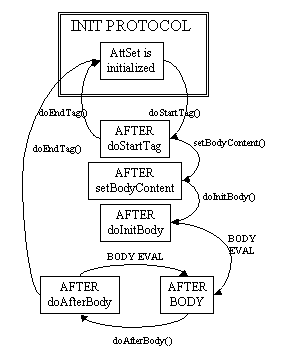
| The BodyTag Interface [16/18] |
| The TryCatchFinally Interface [17/18] |
| Homework [18/18] |
| Overview of Today's Class [1/18] |
some more JDBC
The JSP 2.0 Expression Language
Intro to Custom Tag Libraries
| JNDI [2/18] |
JNDI - Java Naming and Directory Interface
Helps to integrate Java programs into their environment.
Independent of any directory implementation, so can use used to support DNS, NDS, LDAP, NIS
Context - A set of name to object bindings
Naming Systems and Namespaces - A connected set of Contexts
JNDI classes are in javax.naming.*
To use JNDI:
Context
InitialContext, then lookup
others from there:
Context ctx = new InitialContext()
            Printer printer = 	(Printer)ctx.lookup("treekiller");
            printer.print(report);
| Using JNDI in Tomcat [3/18] |
Examples:
web.xml edits
<resource-ref>
  <description> Resource reference to a factory for java.sql.Connection instances
  that may be used for talking to a particular database that is configured in the
  server.xml file (or the context.xml file supplied and placed in the conf/Catalina/localhost
  directory).
  </description>
  <res-ref-name>jdbc/EmployeeDB</res-ref-name>
  <res-type>javax.sql.DataSource</res-type>
  <res-auth>Container</res-auth>
</resource-ref>
Make sure the ordering is in conformance to the web application deployment descriptor DTD! (You can probably put it at the end of your file)
Setup your server.xml (or add a config.xml snippet to your conf/Catalina/localhost
directory) with the settings for the DataSource Factory for
your database
<!--
    Document   : Context.xml
    Created on : September 22, 2003, 10:00 PM
    Author     : Matthew Wright
    Description:
        A context node for this webapp.
-->

<Context path="/se452" docBase="se452" debug="9">
    <Resource name="jdbc/EmployeeDB" auth="Container"
            type="javax.sql.DataSource"/>

    <ResourceParams name="jdbc/EmployeeDB">
      <parameter>
        <name>username</name>
	<value>sa</value>
      </parameter>
      <parameter>
        <name>password</name>
        <value></value>
      </parameter>
      <parameter>
        <name>driverClassName</name>
        <value>org.hsqldb.jdbcDriver</value>
      </parameter>
      <parameter>
        <name>url</name>
	<value>jdbc:hsqldb:hsql:c:\temp\hw</value>
      </parameter>
      <parameter>
        <name>maxActive</name>
        <value>8</value>
      </parameter>
      <parameter>
        <name>maxIdle</name>
        <value>4</value>
      </parameter>
  </ResourceParams>

</Context>
Now, use JNDI code to get the InitialContext and obtain a
reference to the DataSource
    Context initCtx = new InitialContext();
    Context envCtx = (Context)initCtx.lookup("java:comp/env");
    DataSource ds = (DataSource) envCtx.lookup("jdbc/EmployeeDB");
    Connection conn = ds.getConnection();
    //... use this connection to access the database
    conn.close();
| Setting up hsqldb [4/18] |
Hsqldb is a very simple database, but the documentation can be a bit confusing. The best source for complete documentation is the web site, at http://hsqldb.sourceforget.net. Download the 1.71 zip file. It contains documentation, but the docs on the website are better and more complete.
Basically, all you need is a single zip file (hsqldb.jar). You place that in the $CATALINA_HOME/common/lib directory, and it is now available for Tomcat to setup your database connections and for you to access them via JNDI. However, you may want to use some of the utilities available with hsqldb.
To run a utility, there is a script in the hsqldb/bin directory of the zip
file. This script can start any of the utility programs that come with
hsqldb. The ones of note are the Database Manager and the Script tool.
The Database Manager is a GUI tool that you can use to test your queries,
look at data, and configure your database. To run it, just execute
runUtil DatabaseManager. This utility will ask you for the Driver,
url, username, and password for the database. With hsqldb, it is just sa
(for systems administrator), and "" (the empty string - don't type anything
into the GUI) for the password.
Hsqldb operates in three major modes:
In memory is the default, but it doesn't persist data to a file. Once
you exit the tool, the data is gone. This is really useful for testing
code, but also means you have to create your tables every time. The
url for in memory would be jdbc:hsqldb:.
Standalone will only allow one user to connect at a time. This is
fine for testing, and is ok for a JNDI setting since you will only be
a single user logging in at a time. However, if you do this, you will
not be able to run the Database Manager and Tomcat against the db at the
same time. The url for standalone is jdbc:hsqldb:c:\temp\test
where c:\temp\ is the directory, and test is the database name. You can
store your database anywhere you want.
Server mode allows multiple users. You need to start the server in a
separate window, then start Tomcat (or any other connection to the db, such
as the DatabaseManager). This is the most robust (and fastest) mode.
To do this, you need to have hsqldb in your classpath, and you run
the command java org.hsqldb.Server -port 9001 -database c:\temp\test
where the database is the same as above. The url for the server would
be jdbc:hsqdlb:hsql://localhost:9001 for the above database
server.
| Java Code in JSPs - different mechanisms [5/18] |
Let's review the mechanisms we have used so far to run Java code in a JSP.
jsp:useBean, jsp:getProperty,
            jsp:setProperty
actions to call the Bean code
The book lists these as being in order of complexity or application development team size. By employing more of these techniques, we can separate the project into the areas of expertise needed to complete the coding.
The next two techniques we'll look at are the JSP expression language, and custom tag libraries
| JSP Expression Language - concepts [6/18] |
The JSP expression language was initially described in the Java Standard Tag Library. This is just a set of Custom Tag Libraries meant to standardize the most common functions needed in JSPs. The language is independent of JSP except for the set of implicit objects it defines, and can be reused elsewhere. The JSTL version 1.0 can be used in a JSP 1.2 container. In JSP 2.0, some changes were made to the language, and JSTL 1.1 incorporates those changes. JSP 2.0 is required for the JSP EL to be available outside of the JSTL tags.
The EL is based on:
PageContext attributes)JSP EL is inspired by ECMAScript (a.k.a JavaScript) and XPath (XML)
JSP EL is meant to replace Java Code in JSPs, and with 2.0 it is
available in attribute values and template text using the construct
${expr}
| JSP Expression Language - capabilities [7/18] |
The JSP EL has the following capabilities:
jsp:useBean,
you can access an object in any scope just using its name:
${beanName}
${beanName.property}
Lists, Maps
using shorthand notation as well: ${elements[5]}
${header["User-Agent"]}
${test ? option1 : option2}
| JSP Expression Language - setup [8/18] |
In a JSP 2.0 container, you have some control over the EL.
To turn it off:
isELEnabled attribute of the
page directive
\${
instead of ${
You can also turn off scriptlets for a set of JSPs using the jsp-property-group element of web.xml
Examples:
disabling EL:
        <jsp-property-group>
            <url-pattern>*.jsp</url-pattern>
            <el-ignored>true</el-ignored>
        </jsp-property-group>
disabling scripting:
        <jsp-property-group>
            <url-pattern>*.jsp</url-pattern>
            <scripting-invalid>true</scripting-invalid>
        </jsp-property-group>
| JSP Expression Language - accessing variables [9/18] |
To access a scoped variable, just use the variable name in the
EL syntax: ${name}
The following would be equivalent:
<%= pageContext.findAttribute("name") %>
or
<jsp:useBean id="name" type="package.className" scope="..."/>
You need to makes the variable names are valid Java syntax for names. It is possible to store the name under any string, so make sure these names are valid as variable names
| JSP Tag Extensions [10/18] |
Allows introduction of new actions into a JSP
A collection of actions that encapsulate some functionality to be used in JSPs.
A Tag Library can be used to define a specialized sub language of JSP that allows the users of that library to use it naturally with JSPs.
Goals of Tag Libraries
The JSP Process - when a JSP is processed, it follows these steps:
| Creating Tags [11/18] |
A custom tag consists of a tag handler and a tag library descriptor
Types:
Tag, BodyTag or IterationTag interfaces.
SimpleTag or
tag extensions created using only JSP syntax
instead of Java
To use the tag:
A custom tag must implement the javax.servlet.jsp.tagext.Tag
or javax.servlet.jsp.tagext.SimpleTag
interface (which now extends javax.servlet.jsp.tagext.JspTag
for organizational purposes
This is usually done by extending a base utility class
javax.servlet.jsp.tagext.SimpleTag implements JspTag
javax.servlet.jsp.tagext.TagSupport implements IterationTag, Tag
javax.servlet.jsp.tagext.BodyTagSupport implements BodyTag, IterationTag, Tag
IterationTag extends TagBodyTag extends IterationTag
The Tag interface supplies doStartTag()
and doEndTag()
BodyTag supplies doInitBody(), setBodyContent()
IterationTag supplies doAfterBody()
TryCatchFinally supplies doCatch(), doFinally()
and helps tags manage resources better
| Implementing a Tag Handler [12/18] |
To implement a tag handler:
doTag() -- for Simple TagsdoStartTag()doEndTag()doInitBody()doAfterBody()
| The SimpleTag Interface [13/18] |
doTag() - Called by the container to invoke this tag,
and is called once and only once. The lifecycle for SimpleTag is
simpler than Tag, IterationTag, or BodyTag.
Lifecycle:
setJspContext() and setParent()
methods are called by the container. The setParent()
method is only called if the element is nested within another
tag invocation.
setJspBody() method is called
by the container to set the body of this tag, as a JspFragment.
If the action element is empty in the page, this method is not
called at all.
doTag() method is called by the container. All
tag logic, iteration, body evaluations, etc. occur in this method.
doTag() method returns and all variables are synchronized.
| The Tag Interface [14/18] |
doStartTag()
doEndTag()
Lifecycle:

| The IterationTag Interface [15/18] |
doAfterBody()
Lifecycle:

| The BodyTag Interface [16/18] |
doStartTag() returns SKIP_BODY
doStartTag() returns EVAL_BODY_INCLUDE
doAfterBody() and doEndTag() are invokedsetBodyContent(BodyContent b)
doStartTag() returns EVAL_BODY_INCLUDEdoInitBody()
setBodyContent()Lifecycle:

| The TryCatchFinally Interface [17/18] |
An auxiliary interface for tags that want more control over resources
doCatch()
Throwable occurs while evaluating
the body in
Tag.doStartTag()Tag.doEndTag()IterationTag.doAfterBody()BodyTag.doInitBody()
doFinally - invoked in all cases after
doEndTag() for any class implementing Tag, IterationTag,
or BodyTag
| Homework [18/18] |
Goal: To write a JSP/Servlet/JavaBean web application that uses a database (and JDBC with JNDI) to store persistent data.
Supply the application as a deployable war file. Test deploying it before submitting it to make sure you have the format right. Place the source files for the servlet in a src directory in the war file. Please link the homework assignment to the index.html file in the document root. Please do not include the hsqldb.jar file in your lib directory, I already have a copy. (You should be placing it in your own tomcat_home/common/lib directory instead of in your webapp directory.)
Before submitting your code, practice building the entire environment from scratch to ensure that your database building code is correct and that your configurations are set correctly.
Do not write code that has any paths/drivers/urls hardcoded in it. Do not open any text files in your code for data (I know this isn't what we would do in the real world, but it is easier to test and grade). Everything should be configurable via the supplied xml files (config.xml and web.xml)
Grading Breakdown:
| Item | Points |
|---|---|
| configuration (web.xml and context.xml) | 10 |
| Program to build database | 20 |
| Servlet code that integrates to db | 30 |
| JSP/JavaBean implementation | 20 |
| Coding style and JavaDoc | 10 |
| Proper Submission | 10 |
| Total: | 100 |
Revised: 11/3/2003