Menu
- Home
- About
- Blog
- Classes
- Online Learning
- Publications
- Presentations
- Year of AI
- ABCs of DE (Distance Education)
- Flex Best Practices
- Broadcast Like a Professional (from Home)
- Broadcast like a professional on an amateur's budget
- Turn on, tune in, and drop out
- Overcoming Barriers II
- So, they have asked you to teach an online course…
- The Mini Studio / Video Best Practices
- Finding Value In Online Discussion
- Overcoming Barriers
- Video Best Practices
- Assessment In Online Learning
- Building the MiniStudio
- iPad Lecture Capture
- Think Like a Business, Run Like a College: Balancing Both Worlds
- Assessing Students Online
- D2L RUG 2012
- "It's-a me, Mario!"
- One Size Does Not Fit All
- Teaching with Twitter and Google Wave
- Fusion 2010
- D2L Study
- Guerilla Lecture Capture
- Barefoot Vodcasting
- DOTS: ScreenFlow
- DOTS: Video
- Tech Tuesdays & Flex Fridays
I presented at the 37th Annual Conference on Distance Teaching and Learning. The presentation took place on Thursday 5th August 2021 from 2:45-3:30 PM.
There are several assets you can download:
There are several assets you can download:


Broadcast Views
Last year I encountered a problem. A friend of mine asked me to record a talking head video for an online program he was creating. I created a script to work from, but I could not memorize the script. I attempted to simultaneously look at my webcam and script. The resulting video was awful – I looked nervous and shifty. I decided then to find a solution that would work at home.
Luckily for me there was a solution. Newsreaders have for years been able to look at camera and read from a script.And that solution is a TelePrompTer, also known as an autocue.
Luckily for me there was a solution. Newsreaders have for years been able to look at camera and read from a script.And that solution is a TelePrompTer, also known as an autocue.
History of the TelePrompTer
So, let’s take a brief detour into the history of the TelePrompTer and how they work. Live television blossomed in the U.S. in the 1950s. Whilst there were accomplished actors who could memorize a script, there was a plentitude of onscreen talent that had considerable difficulty remembering their lines. Because remembering your lines is hard.
For some, cue cards became the solution (requiring a skilled cue card operator). Television shows like SNL still employ this technique.
Then in the 1950s live television started to use in-camera teleprompters that allowed actors to look directly at the television audience as they read their lines. The technology was introduced to the general American population in a 1951 Life article entitled “Ways to End TV Fluffs.”
The technology uses a mainstay of traditional theatrical special effects known as “Pepper’s Ghost,” where an illuminated figure off-stage is reflected on a large piece of glass positioned at 45 degrees to the audience. The audience can see clearly through the glass to actors and scenery on stage, but they can also see a ghostly apparition superimposed on their view. You may notice similar visual artifacts in the glass windows on planes, trains, and automobiles.
TelePrompTer Home Use
In terms of how a teleprompter works for home use, there are four components:
All combined, this allows someone to look directly at a camera and see a script in the exact same spot.Like the opening crawl to the Star Wars movies, the text rolls up the screen (at the speed that the presenter talks). The result is footage where the presenter maintains comfortable eye contact with the audience.
- The camera
- A shroud. Basically, a piece of black cloth that shields the glass from light.
- A beam splitter. A piece of clear glass held at 45 degrees from the viewer.
- A video monitor. The image from the monitor is reflected on the beam splitter.
All combined, this allows someone to look directly at a camera and see a script in the exact same spot.Like the opening crawl to the Star Wars movies, the text rolls up the screen (at the speed that the presenter talks). The result is footage where the presenter maintains comfortable eye contact with the audience.
Putting Things Into Practice
OK, so we have the theory. How do I put this into practice?
My wish list was that this would work on both Mac and PC (preferably with my laptop). That this would work for both live events (such as Zoom, Teams, Hangouts) and recordings. Crucially I needed this to display all/any screen content - not just text crawling across the screen. Lastly, I wanted all this to be affordable.
My wish list was that this would work on both Mac and PC (preferably with my laptop). That this would work for both live events (such as Zoom, Teams, Hangouts) and recordings. Crucially I needed this to display all/any screen content - not just text crawling across the screen. Lastly, I wanted all this to be affordable.
Phase One
Assembling this for home use required five components:
- Teleprompter
- Teleprompter software
- Teleprompter stand
- Camera
- Microphone
Teleprompter
In Phase One I tested to see if this was a viable option going forward. My teleprompter of choice was the Glide Gear TMP 50. Designed to work with smartphones and small tablets. In use, this displayed a mirror image of whatever I placed on the tablet display. The mirrored text was not something I could comfortably read, so teleprompter software rendered regular text into something I could read on the beam splitter display. But this created a limit for me. I wanted to be able to use any software tool in the teleprompter. I had to look for something beyond regular teleprompter software.
Teleprompter Software
My first idea was to use a Windows Surface Pro. Here, the keyboard easily detaches leaving a powerful tablet, but for this to work I needed the regular display to be mirrored – which would then look normal to me after being mirrored by the beam splitter display. Sadly, Windows does not have this option built into the operating system. However, I found a $40 software tool that could do this. Ultramon could flip the Windows display both horizontally and vertically. However, there were two major limitations:
I viewed this option as a dead end and decided to go another route. Instead, I would use an iPad as the video monitor display. The critical issue was finding a way to mirror flip the iPad display so that it looked like a regular display when reflected in the beam splitter display.
To date, I have only found one way of mirror flipping the iPad display. Luna Display is a combination of hardware (a small dongle connecting to the HDMI, USB-C, or MiniDisplayPort) and software (that has a true teleprompter mode). I saw this is a viable way forward.
- The Ultramon software places a system load on the Windows operating system and lowers the framerate. Things were noticeably slower.
- Ultramon applies these settings to a secondary display, not the Surface Pro main display. However, I found a workaround. I could use a Mini DisplayPort Display Emulator (otherwise known as a dummy plug) to fool the operating system into thinking a second display was attached, and then use scripting to replicate these setting back to the Windows Surface primary display.
I viewed this option as a dead end and decided to go another route. Instead, I would use an iPad as the video monitor display. The critical issue was finding a way to mirror flip the iPad display so that it looked like a regular display when reflected in the beam splitter display.
To date, I have only found one way of mirror flipping the iPad display. Luna Display is a combination of hardware (a small dongle connecting to the HDMI, USB-C, or MiniDisplayPort) and software (that has a true teleprompter mode). I saw this is a viable way forward.
Teleprompter Stand
The teleprompter needs to be raised to eye level. I could do this with either a tripod or a microphone stand. Tripods take up a significant amount of desktop real estate, so I opted to use a microphone stand. I went with a Gator Frameworks microphone stand, as this had the heaviest base I could find. A heavy base reduced the likelihood of the teleprompter toppling over.
Camera
Then I needed to select a camera. Some prefer to hook a regular digital SLR up to their computer (via an HDM to USB capture card), as this results in a superior image. I went with a regular webcam, as this was a simpler solution.
Microphone
Using the built-in microphone on my laptop was an option, but an external microphone promised improved audio quality. Here I could go with a headset or a desktop microphone. I opted to go desktop, as a headset made me look too much like I was flying a helicopter in my videos.
So, I put all the components together. Everything worked. It was a little ugly, but it worked.
So, I put all the components together. Everything worked. It was a little ugly, but it worked.
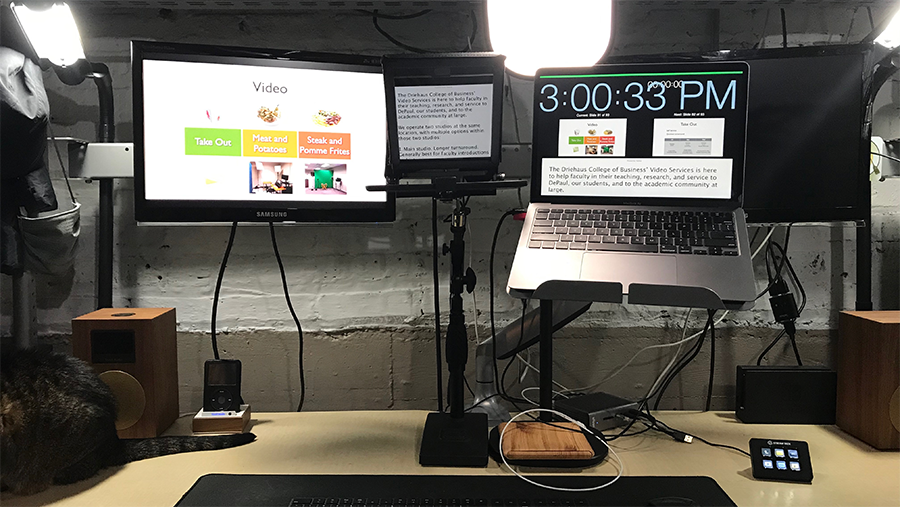
I was able to record the videos I wanted, reading from my presenter notes in Keynote, whilst looking directly at the camera. Like many recording at home, a cat frequently was intrigued by my actions.
However, there were improvements I could make. A larger teleprompter would allow me to see content more easily. Being able to quickly adjust the height and placement of the teleprompter would increase my comfort. Crucially, I needed to be able to switch off any status lights on my webcam, as these shone through the beam splitter display. I needed to be able zoom in and out of the webcam image, cropping any unnecessary content. Lastly, using a wired connection from my laptop to my iPad (rather than connecting wirelessly) was preferable, to avoid network congestion.
However, there were improvements I could make. A larger teleprompter would allow me to see content more easily. Being able to quickly adjust the height and placement of the teleprompter would increase my comfort. Crucially, I needed to be able to switch off any status lights on my webcam, as these shone through the beam splitter display. I needed to be able zoom in and out of the webcam image, cropping any unnecessary content. Lastly, using a wired connection from my laptop to my iPad (rather than connecting wirelessly) was preferable, to avoid network congestion.
Phase Two
Phase Two was where I made improvements. I went with the larger Glide Gear TMP 100 teleprompter. This allowed me to use larger iPads.
I placed dual monitor arms on my desktop. I could easily adjust the height and placement of both my laptop and my teleprompter. The monitor arms resulted in more of my desktop being clear of obstructions (and things I could bump into).
I upgraded to the Logitech Brio webcam. Here, I had more control of the image and webcam settings. The Brio also has a 4K sensor, so cropping the image did not unduly impact final video quality.
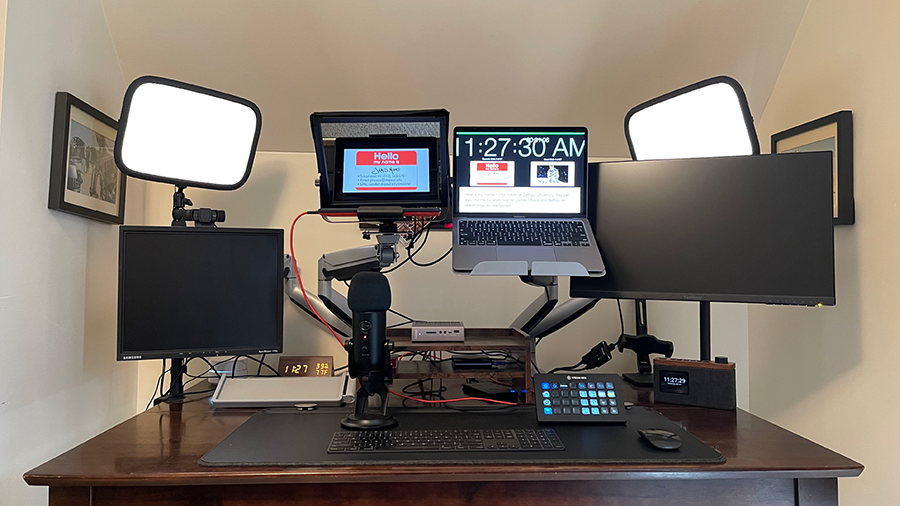
So, what did the final setup look like? Not as ugly as before, and far more usable.
I placed dual monitor arms on my desktop. I could easily adjust the height and placement of both my laptop and my teleprompter. The monitor arms resulted in more of my desktop being clear of obstructions (and things I could bump into).
I upgraded to the Logitech Brio webcam. Here, I had more control of the image and webcam settings. The Brio also has a 4K sensor, so cropping the image did not unduly impact final video quality.
So, what did the final setup look like? Not as ugly as before, and far more usable.
However, there were extra items that I went with that vastly improved both my comfort and the quality of my live and recorded sessions.
Lighting
To look good on camera you will want soft lighting in front of you. Professionals invest in desktop lighting to improve their presence on camera. In a studio, you would use the traditional three-part lighting system with back light, key light, fill light and the presenter in the middle. I went with two Elgato Key Lights on my desk. These allowed me to adjust both color temperature and brightness.
mmhmm
Sharing content in Zoom can be a bit of a pain, introducing a delay as I switched between screen-shared content. The mmhmm app provided me studio-like controls to adjust shared content and effects simply and quickly in both live and prerecorded sessions.
Greenscreen
You may look great on camera, but your environment may not look as good. You also want to be careful that items in the background do not betray your privacy. You, or someone who lives with you, may have a medical condition, and you may inadvertently show prescription drugs in the background to your Zoom participants. The same advice goes or books, posters, alcohol, and other recreational items that you are happy to display at home, but perhaps less happy to display in more formal environments - particularly since your audience can easily record Zoom sessions for posterity. I went with an Elgato Collapsible Chroma Key Panel to provide privacy and to improve the quality of my virtual backgrounds.
Stream Deck
Controlling lights, multimedia, and system settings during live sessions could be difficult at times. I used an Elgato Stream Deck to assemble all the controls I would be using in one easy-to-find location.
Clock
Lastly, focusing on the teleprompter in front of me sometimes resulted in my losing track of time. A large clock (within easy view) prevented me from missing my cues.
Overview
So, was it worth the effort? For me, it was. The improvement in overall quality and efficiency was most noticeable in pre-recorded videos I created. Being able to look at camera whilst following presenter notes in PowerPoint and Keynote was a definite boon. The improvements were not as noticeable, perhaps, in live sessions. However, I did feel that I was directly addressing my audience and making virtual eye contact. This was worth the effort.