Minix Operating System with a VMWare Virtual Machine
Contents
- VMWare Briefly
- Minix Briefly
- Minix Superuser
- Adding Minix User Accounts
- Copying Files Between VMWare Minix Guest and the Host
- Installing Additional Packages from Minix installation Disk (iso file) in VMWare
VMWare Briefly[top]
VMWare Player allows you to create a virtual machine running a "guest" operating system such as Minix on your physical machine - the "host". The virtual machine and its guest os are embodied as a file (.vmx file) on the host and from the point of view of the host, runs as process(es) on the host machine.
By itself VMWare Player is not useful. You need a vitual machine (a .vmx) file to load into VMWare Player. Where does the .vmx file come from. It can be created with other VMWare products such as VMWare Workstation. However, Tanenbaum's Minix site has an existing virtual machine file for Minix. This is what we will use.
So there are two initial steps in order to get started with Minix.
- Download and install VMWare Player (free) for your host system.
- Download the Minix virtual machine for use with VMWare.
Minix Briefly[top]
When you run VMWare Player, you select the virtual machine (.vmx file) to use. There are other prebuilt virtual machines such as various distributions of Linux. After selecting the Minix virtual machine, VMWare tries to "boot" up Minix in the VMWare Player window. It tries to discover devices as in booting an os on a physical machine. This includes discovering network interface, CD rom, and perhaps the sound card. However, files on the host machine are not accessible directly to Minix or vice versa. Even files created by the host on a CD are not directly accessible from Minix since it has a different file system than the host.
You see a log of commands being executed during the boot process in the VMWare window on your host machine. When booting has finished, a prompt appears, but you may find that typing at the prompt doesn't seem to work. You must first direct input to the virtual machine. You can do this by clicking the mouse in the VMWare window or by typing ctrl-G (when the VMWare window is the foreground window on the host). After interacting with Minix for a while you may want to switch back to the host, but you find that the mouse cursor has disappeared. To switch back to the host (and get the mouse cursor back), type the Ctl-Alt combination.
In the Minix virtual machine, you can create users, files, install utilities, shutdown the virtual machine (as superuser), etc. Any additions or changes you make or to files, directories, users, etc. will modify the virtual machine and be available the next time you start the virtual machine. However, there are a few things to note:
First, you should be careful about shutting down Minix properly when you terminate the VMWare Player session. You can set Player preferences either to "suspend" the virtual machine or to "power off" the virtual machine. If you "power off", you must first properly shutdown Minix (execute the shutdown command as superuser). If you suspend the virtual machine on exiting VMWare Player, then when you startup the Player again, it should restore the state of Minix processes, etc. at the time of exiting. Suspending seems to work reliably, but once or twice I've had some problems, so I generally shutdown on exiting VMWare.
Second, it isn't a bad idea to have multiple copies of the .vmx files. If you make some change to the Minix kernel that totally messes it up, it is nice to revert to a version that is in a stable state. However, if you simply copy a .vmx file to a different location from the original place you loaded it into VMWare Player and later try to use it from the new location, the Player will act surprised, notify you that the .vmx file has moved and ask if you want to make the new location the one to remember. Everything is ok, just answer yes.
Minix Superuser[top]
The prebuilt Minix machine for VMWare Player has a superuser account with empty password. The account name is root, just as for Unix and its variants. You can change the password with the passwd command, but be sure to remember it if you do. You can also create "user" accounts easily with the adduser command. This is a good idea in general, since the root user account is permitted to execute commands without restriction and can inadvertently destroy precious files, etc., that a normal user would be prevented from doing. On the other hand you will need to "become" super user on occasion. For example, when you recompile the Minix operating system components. You can become superuser temporarily from a user account by the su command. At the prompt ($ or whatever the prompt is):
$ su root
If you have set a password for root, you will be prompted for the root password. After you have finished the operation requiring root privileges, you return back to your ordinary user account by "logging out" of the superuser account. E.g. ctrl-d will log you out of shells based on the bourne shell, or by typing exit. If you type ctrl-d twice in this situation, the second one would log you out of your user account. The you would get the terminal (or console) login prompt and would have to log in again.
Adding Minix User Accounts[top]
Below is the Minix man page (manual page) for the adduser command.
You get this manual page listing at a Minix terminal by the man command. The output can also be redirected to a file or piped as the input to some other program:
1. Output to the Minix screen:

    $ man adduser

2. Create an output file named, say, adduserPage.txt, Use a pipe to
   direct the output to the bsfilt command which filters out
   backspaces, then redirect that output to a newly created file
   named, say, adduserPage.txt

    $ man adduser | bsfilt > adduserPage.txt

(bsfilt is Minix's version of the typical Unix col command)

3. Copy the file adduserPage.txt to the host machine's clipboard using
   a program, vmw, which must be obtained separately from the Minix distribution.

   $ vmw copy <adduserPage.txt
ADDUSER(8)                Minix Programmer's Manual                 ADDUSER(8)


NAME
     adduser - add a new user to the system

SYNOPSIS
     adduser user group home-dir
             ---- ----- ---- ---

EXAMPLES

     adduser ast other /usr/ast
                         # How user ast could be added

     adduser bin operator /usr/src
                         # How user bin could be added

DESCRIPTION

     Adduser adds  a  new  user  to  the  system  by  making  new  entries  in
     -------
     /etc/passwd  and  /etc/shadow  for  the  new  user,  creating  a new home
     directory, and copying  the  contents  of  the  template  home  directory
     /usr/ast  into  it.   The user-id of this new user will be the first free
     number not less than 10.  The password is initially empty, the full  name
     must  be  set,  and the shell is the Bourne Shell, /bin/sh . Use passwd ,
                                                                      ------
     chfn , and chsh to change.
     ----       ----

SEE ALSO
     login(1), passwd(1), passwd(5).
Copying Files Between VMWare Minix Guest and the Host[top]
Kenichi Takahagi has written tools for Minix running in VMWare products exploiting the VMWare implementation that largely overcome the problem of transferring files between the Minix VMWare guest and the host machine without having to requiring a network connection (i.e. without having to setup and use ftp on the host and guest).
The link Takahagi's site is:
http://chitchat.at.infoseek.co.jp/vmware/vmtools.html#vmw
The zip file vmw-060510.zip contains versions of three utilities, but not all work in VMWare Player. The vmw program does. This is the Minix executable file, but sources are available also for a number of machines. You minimally need executable vmw file for Minix.
Examples:
1. In Minix copy the file sample.c to the host clipboard

   $ vmw copy <sample.c


2. In Minx paste the contents of the host clipboard into new file
   prog.c

   $ vmw paste >prog.c
Installing Additional Packages from Minix installation Disk (iso file) in VMWare [top]
The Minix installation disk contains a large number of additional software packages that can be installed in the prebuilt VMWare machine.
-
First, download and unzip this Minix installation disk:
-
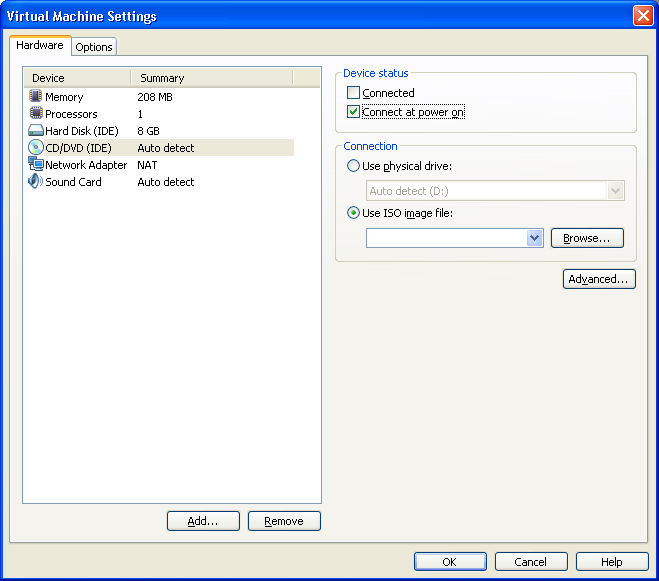
In VMWare Player change the settings for the virtual machine.
Select the CD/DVD (IDE) Device panel, then check to Connect at power on in the Device status panel.
In the Connection panel select Use iso image file and browse to the .iso image file you downloaded and click Ok.
-
Start Minix, login as root, and run the command "packman" (package manager).
-
Page through the list of packages and note the number of any package you want to install. A package may be listed twice - once from the "net" and once from the "cd". Use the number for the "cd" version.
-
When prompted for the package to install enter the number and the package will be installed.