The steps to configure TextPad to use Moscow ML are:
It should be installed at the toplevel of some drive. These instructions assume you have installed Moscow ML in the directory D:\mosml, but it could be C:\mosml or any other toplevel drive letter.
1. Open the Configure -> Preferences item.

2. Select Tools in the left pane, click the Add button and select Program....

Clicking on Program... will open a dialog box allowing you to search for the mosml.exe executable file.
The mosml.exe binary will be in the directory d:\mosml\bin:

The name of the Program selected (without the .exe) will appear in the middle pane. In this case the name is ML.
The Apply button will be enabled. Be sure to click this button. so that your Program seletion will be added to the Tools menu.
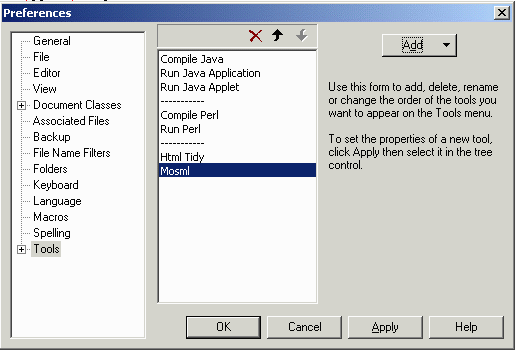
Click on the Mosml to select it. You can then edit it to say "Run Mosml".

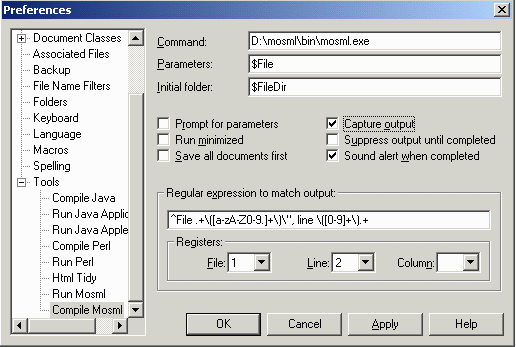
In the left pane, expand the Tools node and select ML. This will change the display to that shown below for configuring how ML will be used by TextPad.
The only thing you should have to do to configure this menu item to run ML files open in TextPad is to make sure to
1. uncheck the Capture output checkbox
2. change $File to -P full $File
   in the Parameters: textbox
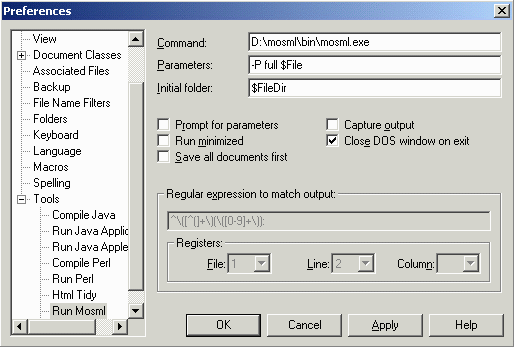
Running ML from TextPad opens a command window and allows both input and output from the ML program you are currently using in TextPad.
To locate and correct compile errors, you need a second menu item also associated with the mosml.exe, which will capture the error messages into TextPad.
So repeat the previous steps to add a second ML to the Tools menu.
Although TextPad doesn't care if you have two Tools menu items named ML, it is probably better to rename the second one to be something like "Compile ML".

Two changes must be made:
^File .+\([a-zA-Z0-9.]+\)\", line \([0-9]+\).+
In order to let TextPad know about the keywords, syntax for comments, etc., in ML, you will need to copy a "syntax" file. Here are sources for an appropriate syntax file. Each zip file contains a syntax file (.syn) and instructions (.txt). The first is for Moscow ML and the second, for standard ML.
mosml.zip (contains mosml.syn and mosml.txt)
sml.zip (contains sml.syn and instructions.txt)
Copy this file to the Samples directory of the installation for TextPad; e.g, to C:Program Files\TextPad\Samples directory, assuming that is where it was installed.
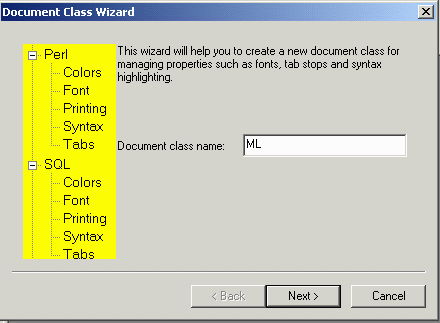
First, close any open documents in TextPad. Then click on the Configure menu and select New Document Class...

Follow the instructions and when prompted and enter:
ML (for the document class name)
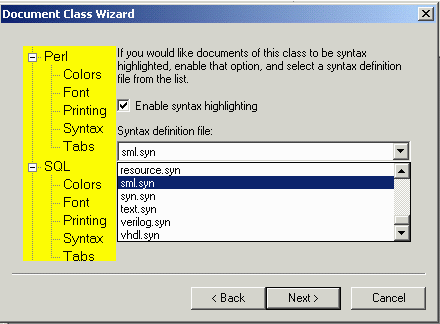
*.sml (for the document class "members")
sml.syn (for the syntax file; it should be in the list
provided you have copied that file as described
above.)