
This document describes how to create a zip archive. A zip archive is a special file that combines any number of other files into one file and compresses the data while combining the files. The data compression results in the combined file being smaller than the sum total of the sizes of the individual files. This makes zip archives ideal for sending email attachments, among other things. There are many tools available for creating zip archives. This document describes how to use a program called zip that will allow us to combine multiple files into one file in such a way that the original files can be extracted later by the grader.
The first thing you should do is download the zip program from this web page by clicking on the word download earlier in this sentence. When the browser prompts you where to save the file, save it to the root directory of your disk. That is, save it as C:\zip.exe or h:\zip.exe where h is a flash drive of some kind.
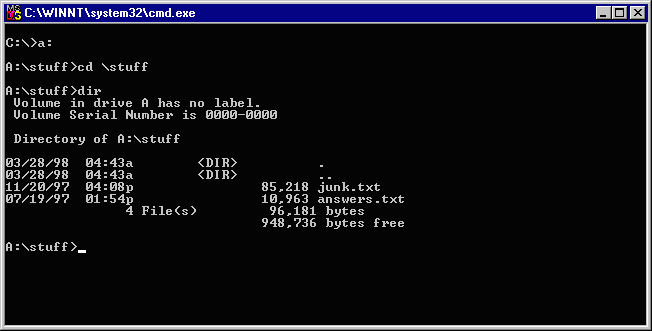
To create a zip file, open a command window by clicking on the Start Menu, then choosing Programs and then choosing Accessories. On the drop down menu, you will see a Command Prompt. When you click on it, you should see a window that looks something like the following (this is a screen shot from Windows NT, which is slightly different from what you will see in the universities labs have).
Let's assume that your files are drive A, in a subdirectory named stuff. To move into that directory, do the following:
Your window now should look something like this.
Notice that I have put 2 files into my stuff directory. Let's pretend those are the ones I want to submit for my assignment. I must now use the zip program to combine them into one. Let's also assume that the drive that we're using is the one on which you saved the zip.exe program to. To create the zip archive, simply do this:
\zip mystuff *.*
This says to run the zip program in the root directory of the current disk (that's the \zip part), make a zip file named mystuff.zip (note that we didn't have to type the .zip part) and insert all of the files in the current directory (that's the *.* part). After typing that command and then typing dir to see the results, here's what my screen looks like:
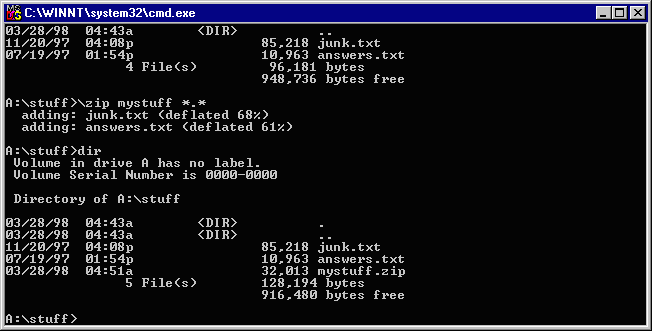
Take a look at the directory listing at the bottom of the picture. Note that the original files (junk.txt and answers.txt) are still there. The zip program does not change them in any way. Also notice that there is a new file named mystuff.zip, which is the file we requested be created. Take a look at the sizes of the three files. Note that the combine sizes of the original files is approximately 95K but that the zip file is only 32K—that's a 3-to-1 savings in space. The file mystuff.zip is the one you would post on the dlweb page under the proper assignment.
That's all you need to know about using zip for this course, but you might be interested to know that there is a similar tool that extracts files from the zip archive. That tool is named unzipand you can download it if you wish. To extract files from a zip archive, simply run the unzip program and type the name of the zip file after it. You do not have to type the .zip at the end of the name. For example, to extract the files from the file I created above, I would do this:
unzip mystuff
Finally, there is a point and click version of all of this available as a program named WinZip. If you have that program and know how to use it, then by all means use it. It comes installed on many computers and is also available in the labs. The files it creates will work just as well. If you don't have it on your computer, you can buy it from the link of WinZip above or you can just use the zip.exe you just downloaded.