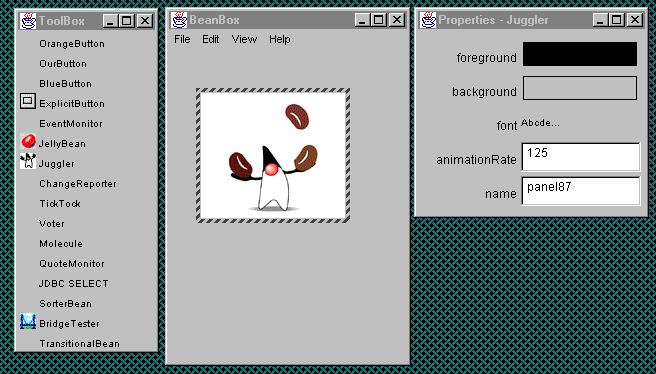
The picture shown above is from Starting and Using the BeanBox ( reference 3).
This page is edited by Kali Wong
&
Modified by Hsiang-Ling Hu
3. Starting and Using the BeanBox
A notable difference between Java Beans and other component architectures (such as COM or OpenDoc) is that Java Beans are Java-centric, exclusively targeted at software development in Java. To ease integration with the Windows platform, bridges between Beans and COM have been developed.
JavaBeans brings component technology to the Java platform. You can use JavaBeans to write Java classes, called Beans, that you can visually manipulate within application builder tools. This document is a hands-on guide to learning JavaBeans and the Beans Development Kit (BDK). The JavaBeans API Specification provides a complete JavaBeans description.
The software you'll need to understand and explore Beans is available
free on the web. In addition to the Beans
Development Kit (BDK), you will need the Java
Development Kit (JDK).
The JavaBeans API makes it possible to write component software in the Java programming language. Components are self-contained, reusable software units that can be visually composed into composite components, applets, applications, and servlets using visual application builder tools. JavaBean components are known as Beans.
Components expose their features (for example, public methods and events)
to builder tools for visual manipulation. A Bean's features are exposed
because feature names adhere to specific design patterns. A "JavaBeans-enabled"
builder tool can then examine the Bean's patterns, discern its features,
and expose those features for visual manipulation. A builder tool maintains
Beans in a palette or toolbox. You can select a Bean from the toolbox,
drop it into a form, modify it's appearance and behavior, define its interaction
with other Beans, and compose it and other Beans into an applet, application,
or new Bean. All this can be done without writing a line of code.
The JavaBeans Development Kit (BDK) is intended to support the early development of JavaBeans components and to act as a standard reference base for both component developers and tool vendors. The BDK provides a reference Bean container, the "BeanBox" and a variety of reusable example source code (in the demo and beanbox subdirectories) for use by both JavaBeans component and tool developers.
The BDK is not intended for use by application developers, nor is it intended to be a full-fledged application development environment. Instead, application developers should consider the various Java application development environments supporting JavaBeans.
This BDK 1.0 release requires you to have installed the Java Development Kit (JDK) 1.1 or later. We recommend using JDK 1.1.4 or later.
The BDK is qualified for Solaris 2.4, Solaris 2.5, Windows 95, and Windows
NT 4.0. However the BDK is "pure Java" and should run on any JDK 1.1 enabled
system.
You can use these commands to start the BeanBox, The beans/beanbox.
directory contains Windows (run.bat) and Unix (run.sh) or use make:
gnumake run
Or:
nmake runSee the BDK files beans/doc/makefiles.html and beans/doc/gnu.txt for information about getting copies of these make tools.
When started, the BeanBox displays three windows: The BeanBox, ToolBox, and the Properties sheet. Here's how they look:

The picture shown above is
from
Starting
and Using the BeanBox ( reference 3).
This illustration shows the BeanBox with the Juggler demo Bean placed within it. The hatching around the Juggler is how the BeanBox indicates the selected Bean. Clicking on a Bean selects it.
The Properties sheet displays the selected Bean's properties. After
dropping a JellyBean instance on the BeanBox, the Properties sheet
displays the JellyBean properties: color, foreground, priceInCents,
background, and font.
In this section you will learn more about Beans and the BeanBox by
import java.awt.*;
import java.io.Serializable;

public class SimpleBean extends Canvas
                     implements Serializable{

  //Constructor sets inherited properties
  public SimpleBean(){
   setSize(60,40);
   setBackground(Color.red);
  }

}
SimpleBean extends the java.awt.Canvas component. SimpleBean also implements the java.io.Serializable interface, a requirement for all Beans. SimpleBean sets the background color and component size.
javac SimpleBean.java
This produces the class file SimpleBean.class
Name: SimpleBean.class
Java-Bean: True
jar cfm SimpleBean.jar manifest.tmp SimpleBean.class
See the JAR File Format trail, and the JDK JAR file documentation for complete information on JAR files.
# gnumake file
CLASSFILES= SimpleBean.class

JARFILE= SimpleBean.jar

all: $(JARFILE)

# Create a JAR file with a suitable manifest.
$(JARFILE): $(CLASSFILES) $(DATAFILES)
        echo "Name: SimpleBean.class"  manifest.tmp
        echo "Java-Bean: True"  manifest.tmp
        jar cfm $(JARFILE) manifest.tmp *.class
        @/bin/rm manifest.tmp

# Compile the sources
%.class: %.java
        export CLASSPATH; CLASSPATH=. ; \
        javac $<

# make clean
clean:
        /bin/rm -f *.class
        /bin/rm -f $(JARFILE)
Here is the Windows nmake version:
CLASSFILES= simplebean.class

JARFILE= simplebean.jar

all: $(JARFILE)

# Create a JAR file with a suitable manifest.

$(JARFILE): $(CLASSFILES) $(DATAFILES)
        jar cfm $(JARFILE) <<manifest.tmp *.class
Name: SimpleBean.class
Java-Bean: True
<<

.SUFFIXES: .java .class

{sunw\demo\simple}.java{sunw\demo\simple}.class :
        set CLASSPATH=.
        javac $<

clean:
        -del sunw\demo\simple\*.class
        -del $(JARFILE)
You can use these makefiles as templates for creating your own Bean makefiles. The example Bean makefiles, in the beans/demo directory, also show you how to use makefiles to build and maintain your Beans.
Beans communicate with other Beans by sending and receiving event notifications. To see which events SimpleBean can send, choose the Edit|Events BeanBox menu item. A list of events, grouped by the Java interface in which the event method is declared, will be displayed. Under each interface group is a list of event methods. These are all inherited from Canvas.
By default Bean reports are sent to the java interpreter's
standard output, which is the window where you started the BeanBox. You
can redirect the report to a file by changing the java interpreter command
in beanbox/run.sh or run.bat to: java sun.beanbox.BeanBoxFrame
> beanreport.txt
REFERENCES:
3. Starting and Using the BeanBox

